 Marble Magnet People!
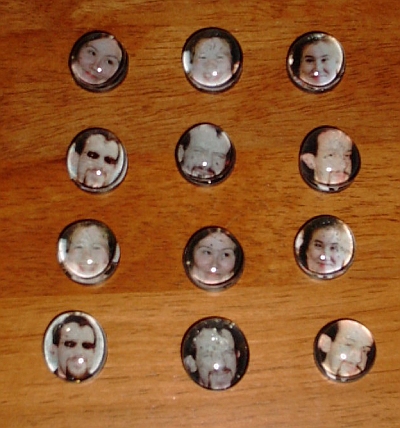
It worked! My cunning plan worked. Instead of using magazine pictures, I successfully put the Snook’s and my faces under the marbles. (Click on the picture to see the full set. Apologies for my crappy camera. They really do look pretty good.) I’d read that using Bubble Jet-printed images wouldn’t work, because the ink is water soluble and runs when you put the glue on it. I had a hunch that color laser printed photos would work better. And they did! If you want to hear how I did it, read on…I tried to follow Megan’s instructions as closely as possible. For you Sydneysiders: I found the magnets (20 mm diameter) at the big Lincraft store in the Imperial Arcade on Pitt Street. They were randomly hanging in the aisle with all the clay. For glue, I got silicone window sealer from my local Mitre 10 hardware store. It came with a long plastic cone/applicator, but I just tossed that. The marbles, as you all know, were the difficult part. In the end I found them at Eastern Flair on King Street in Newtown. (I bought all the clear ones they had, though, so don’t bother trying them for a while.) I also heard that the “Reject Shop” on Oxford Street has them too, but I luckily never had to look there.
Okay, so once I had the equipment, I had to select my pictures. I knew I wanted our faces, so I went through my pictures trying to find clear shots of our heads with interesting expressions. Then I scanned them in at 300 dpi. I managed to get about four faces to each scan (since I didn’t need the rest of the photos and could overlap them a bit). Then using the Gimp (but Photoshop would do just as well), I isolated each face as its own image. Then I used the “oval” selection tool and set it to 20mm by 20mm (thus creating a circle the same size as my magnet). Then I just resized the image until the face fit just right inside the little circle. (Note: You need the high resolution so you get good sharpness and detail when you print. But since your screen can’t display that high, the circles will look way big. Relax; they’ll be the right size when you print.)
Okay, so then I copied and pasted each little face circle onto a blank image. (The idea is to cram as many on the page so you have to print as few sheets as possible.) I only did six for this first trial, but I duplicated them so I had twelve altogether on one sheet. Then I whacked this on a Zip disk and headed ’round the corner to the Copy Shop. Fifteen minutes and a buck-fifty later, I had my pictures.
After that, the rest was easy. I didn’t even bother with putting card down on the magnets first; the paper was nice and thick so I didn’t think it would bleed. None of the ink has run at all, which some people said they experienced using Bubble Jet-printed photos. The sealer still needs a day or two to fully set, but I’m going to declare the photo magnet experiment a success.
aim
November 9, 2002 — 8:10 am
i found some old contact sheets from photography class (strips of negatives printed on photo paper) that’re the perfect size. i already made some from magazines, including the quite-popular “gary coleman” marble magnet – and the “monkey-hockey player” marble magnet. e.t. and john travolta are also on everyone’s christmas list this year!
Tracey
November 22, 2002 — 4:00 pm
i need more marbles! and i can’t find any in Sydney – have you seen any more since? i’ll probably trek into Newtown if i have too
Kris
November 22, 2002 — 4:34 pm
Hi Tracey! Actually I found some at Kmart in the Broadway the other day. They were hanging up near the Brita water filters in the homewares section. (The package reads “Decor Nuggets”, which made me laugh.) Unfortunately there was only one bag of clear ones, which I grabbed. You may get lucky at another Kmart though!
Tracey
November 23, 2002 — 5:24 pm
Kris! You know, i bought a bag of those decor nuggets at Kmart yesterday but they had that silvery shine over it, i didn’t see ANY clear ones though.. i’ve resorted to buying the FaberCastell kit again which i made these (http://www.spacecowgirl.nu/photos/marble_firstlot.jpg) with the other night – i guess they’ll do for now!
Kris
November 23, 2002 — 9:18 pm
You’ve got to check the silvery ones. The Kmart ones I got have a sort of pearly sheen to them, but if you look through them they’re still clear. They did have a bunch that were opaque though.
The ones you made look great! Where did you find the kit? Did you actually paint on the magnets? (I like your blog, especially your great photographs. I was trying to read back through the archives though and the monthly links – beyond the current month – seem to be broken.)
Tracey
November 24, 2002 — 4:01 pm
Well i’m gonna leave Kmart to it – i made about 40 new little ones for christmas presents yesterday (that’s why i haven’t mentioned it in my blog!).
I bought the kit from Target for $15, it comes with 20 big and small marbles, some paints and all the magnet and pin attachments. And yeah, i painted on all of them! I’m not a great painter AT ALL – but they look ok i guess!
http://www.spacecowgirl.nu/photos/marble_secondlot.jpg
Thanks for visiting my journal btw 🙂 The archive month pages don’t work (not sure why), but each individual entry still does!