It’s time to get serious about my sewing, so I’ve made a resolution this year to not buy any new clothes (excluding undergarments, which are in the Too Hard basket for now). Towards that end, I’ve sewn two more new shirts so far in 2017 from Tessuti’s Georgie Top pattern.
 Georgie #1: The first was this short-sleeved version in a vintage fabric remnant I had. (We did a burn test on it and it melts so I reckon it’s probably either nylon or polyester.) I cut the largest size and did an FBA – more on that in a sec – and finished with exposed bindings. For the bindings, since I had limited fabric I didn’t bother cutting them with the provided pattern pieces but instead used a square to make continuous binding via the Colette method. I really like the Tessuti method for doing the back neck keyhole opening. I don’t get their insistence on using tearaway Vilene to stabilise the neck though – it seems like stay-stitching would work just as well? Overall I’m really happy with the finish on this one. All this practice is really paying off! The only outright mistake I made on this project was cutting the sleeves upside-down, so the motif (which looks a little like an insect!) goes the wrong direction. It’s small enough though that (the Snook claims) you only notice when I point it out. 🙂
Okay, so the FBA. Based on my experience with other Tessuti patterns, I decided to do a Full Bust Adjustment on this one before I started. The problem is that I trusted the first result that Google gave me: this Craftsy tutorial. People, this tutorial is WRONG! But I didn’t realise it at the time. So I followed the instructions, not realising that step 7 had a massive error. Then when I went to sew up the side seams, guess what? The front was massively longer than the back. Which makes sense, as that stupid tutorial has you draw the new dart in such a way that you’re adding material to the side. I ended up having to rejig my bodice front on-the-fly and try to make it work, and I still ended up having to cut material off the bottom. So though I’m pleased with the finish on this one, I feel like the fit is slightly weird. The neckline is a little high for me (not really the fault of the FBA though), and there’s excess material on my upper chest. It’s wearable, but not exactly great.
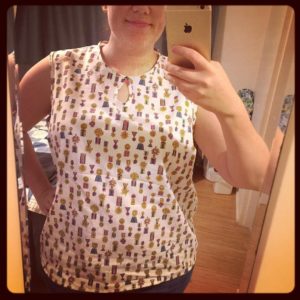 Georgie #2: The second Georgie is this sleeveless version in a vintage cotton remnant. (It’s got little medals all over it!) I was inspired by Gertie’s keyhole blouse to try for a keyhole neckline detail on the front. The first thing I did was print a new bodice front, lower the neckline, and then do a proper FBA. Then I free-handed a U-shape at the center of the bodice front piece and cut it out of my fabric. Rather than using Vilene, I simply stay-stitched the neckline, keyhole, and sleeve openings before I started. I again made my own continuous bias tape via the Colette method. Binding the keyhole was tricky but doable, and I’m really pleased with how flat it turned out! When I bound the neckline, I initially left a gap of about an inch across the keyhole (so it was more of a U-shape than a teardrop). Then I tried it on, and I again had the problem of excess fabric in the upper chest. When I pinched the top of the U-together though (simulating a tuck), it magically disappeared. Huh! So I unpicked half the neckline binding and then redid it, joining the top of the U together into the teardrop. Very happy with that outcome! (If I make this again without a keyhole, I’ll adjust the bodice front to remove that wedge.) As for the sleeves, I did actually cut them and I intended to use them, but when I tried it on for my neckline alterations, I realised I liked it better sleeveless. I debated whether I needed to adjust the sleeve openings – I know that sleeveless garments tend to have larger armholes – but they looked fine. So I simply added an exposed bias binding to each armhole. So far I’m really happy with it!