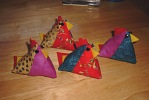
 Somebody recently e-mailed me to say that the pattern I linked for the Funky Chicken Pincushions has disappeared. In lieu I’ve written down the instructions as I remember them, along with a few crude drawings.
You need:
Two squares of different colored fabric, any size will do (though less than 4-inches becomes a bit fiddly)
Felt for the comb, beak, and tail
Stuffing
Buttons for the eyes (optional)
 Basically, the first thing you’re going to do is turn your two solid squares into two multi-colored ones. Start by pinning the two squares together with the right sides facing. Use a pen to draw a diagonal line between two opposite corners (through the center). You’re going to sew two lines down along this one, one on each side. If you’re using a sewing machine, just line up your presser foot with the marked line. If you’re doing it by hand, just mark two more lines approximately 1/4″ on either side. Now sew along those two lines. When you’re done, cut down the center marked line. You now have two new squares, each made up of two different colored triangles. Break out the iron and press each one, opening up the seams and pressing them flat.
 Now it’s time to cut out your beak and comb. There’s no exact size or shape here; just eyeball it. (I tend to make my combs about a third as long as the side of the square.) Lay out one of your squares right-side up. Place the beak and comb as shown in this diagram. Now lay the other square face-down on top of them, making sure the colors align. Pin everything together as best you can.
More sewing! Sew along the dotted line indicated. Start in the corner opposite the beak and comb, and go for an inch or so. Secure the seam and cut the thread. Now start again an inch or so farther along. (This leaves an opening through which you will eventually turn the chicken right-side out.) Turn at the corners and continue to sew around the next two sides, making sure you go through the beak and comb. Leave the last side open. Okay, now you need to cut two tail pieces out of felt. Besically, these are just triangles. I like to make them different colors to coordinate with the fabric. Make one smaller than the other and pin them together through the center. Now here’s the tricky bit (and the part I can’t draw): One side of your square is still open, right? Well, squish it. By that I mean, open it up and line up the two seams in the middle. This is how you get the “pyramid” shape of the chicken. It helps to finger-press those seams open so you can get it lined up just right. You’re going to sandwich your tail in that opening, so use the pin to center it along the seams, with the points inside the chicken and facing up towards the “comb” side. (You’ll have to peek inside there to make sure you’re not putting the tail in upside-down.) Now pin the three layers together and sew across the seam. You should now have the basic chicken shape, except its features are all on the inside.
Use the opening you leave to turn your chicken right-side out. Stuff him through the hole and then slip-stitch it shut as best you can. Add some buttons for eyes if you want, and you’re done! With a sewing machine you can really crank these puppies out quickly, and it’s a great way to use up extra fabric you have lying around. Have fun!
Grace Fischer
February 10, 2003 — 11:23 pm
Thank you so much!! You are the BOMB!!
Kris
February 11, 2003 — 11:21 pm
No problem Grace. Let me know how it goes! (and whether you have any suggestions to make my directions clearer)
Stine
June 23, 2003 — 1:20 pm
Wow,finally found the “how-tos” Thankseversomuch!
Anonymous
January 14, 2004 — 7:02 am
thanks a bunch, i have been trying to get this pattern for ages.how about putting dry rice in for stuffing, thanks again, diane
Kris
January 14, 2004 — 10:16 am
Hmm, that could be neat! You could put rice or linseed and then microwave them to make little heating pads.
Carla
March 27, 2004 — 11:45 pm
Thank you for having the pattern. Thank goodness I printed it before she took her site down. What I do is back the squares with muslin so it is a double layer. Then I use sand for a filling. Makes great little pincushion weights to put on your fabric while cutting.
Anonymous
April 19, 2004 — 4:28 pm
Thank you for sharing! This was so hard to find. Your generousity is appreciated.
Marlene Price
May 15, 2004 — 10:27 am
Thank you so much – I love crafters that share!! ( I met a great friend when I shared how to make different kinds of gift boxes)
MOUSE
Anonymous
January 11, 2005 — 6:51 am
Thank you for sharing this pattern. I saw a completed one and have been searching for this pattern and trying to re-create it (with no success) ever since.
Priscilla
April 7, 2005 — 7:20 am
Thank you for sharing- good charity stall item. Last one I was shown was log cabin and complicated. This can be knocked up any time from stash.
Rebecka
April 8, 2005 — 7:29 am
Thank you, I needed a pin cushion but it tuned out so nicely that my 3 yr old took off with it. My 5 yr old then wanted one and so we made one together. It was his very frst sewing project and he loved it!
Joan Severn
July 31, 2005 — 10:42 am
Thnak you soooo much for sharing this pattern. I have been searching for it. I think it is so cute, I love chickens.
Anonymous
December 10, 2005 — 6:39 pm
I, too, am over flowing with gratitude. I have been looking for this pattern since I saw at a friend’s home. I think my sewing students can manage it, and it’s darned cute! THANKS
JoAnne
January 17, 2006 — 9:07 am
I have been looking for a crochet pattern for the Texas Flag and unable to find it. Can you help?
Kris
January 17, 2006 — 4:22 pm
Uh, I’m not really a craft service provider. This is just a weblog and I only posted this pattern because I’d already linked to it and the site had gone down. I don’t, like, design patterns for a living or anything. Sorry!
Kris
January 17, 2006 — 10:02 pm
Snookums felt I was being overly snarky in my response there, so I’ll apologise. You might have more luck asking in the forums at craft sites like Knitty.
Anonymous
February 27, 2006 — 9:23 am
Thaks for the pattern. I’ve been looking for it for years. Guess I could have broken down, bought one and took it apart but that seemed wrong somehow! Appreciate you sharing! Lisa
Anonymous
October 25, 2006 — 4:26 am
Thanks for posting the pattern… I’ve made three in the past couple of days. Instead of using felt for the comb, I used red beads and make about five or six 2″ loops that flop around on the top. Also added beaded feet… They turned out very cute! Thanks again!!
Lorraine
March 12, 2007 — 8:42 am
I just made one and put beaded feet on it came out great Now my sister wants one. Thank you so much.
Donna
March 26, 2007 — 10:56 am
made a few of these to fill an Easter basket, they were so cute!
Sydney
April 2, 2007 — 6:22 pm
Hi : I have been looking for it for years too, I did buy one though and took it apart, I am making one soon, it so darn cute gotta have one… or two
Kris
April 29, 2007 — 6:47 am
Looks like you posted these instructions over 4 years ago, but I’m so glad. I was just thinking I’d like to make one of these, but where oh where did I ever see any directions. Well, here they are, plain as day, and I just printed them. Thanks so much !!
Brenda
October 15, 2007 — 9:54 am
Gracias, I’ve been searching for this pattern since I saw them at the 2007 Corpus Christi Quilt show. My three year old says “sharing is caring” Blessings to you for sharing.
Cheryl
November 25, 2007 — 6:13 pm
Humble THANK YOU for posting this
was searching online all evening for a simple chicken pattern – and this looks so easy! Plan to try one tomorrow!
I have pet chickens and think this is so cute!
Ziva
March 19, 2008 — 9:42 am
Thanks and thanks again! Been wanting to make these little darlings for a while now. Giving these for Easter to member of my bellydance troupe since we sew a lot! I used tapestry and velvet materials and also the small fluffy feather boa strips for head comb and tail. They are so cute I hate to part with them.
Paula Rogers
April 23, 2008 — 1:49 am
thank you so much. I saw this a long time ago and thought I would remember it in my head. Well, I for-got everything and looked and looked for it to no avail til I found this. I AM SO HAPPY!!
Kathy Fortier
August 22, 2008 — 5:11 am
Thanks for making the pattern easy to read! So glad “your” pattern was illustrated & written correctly!
Colleen
August 7, 2009 — 3:34 am
Thank you so much! My daughter made one of these at sewing camp and wanted to make more! Mine turn out as squares as i was missing that one step. We fill them with rice and use it as a heating bag. Thank you again!
pat
December 21, 2009 — 6:48 am
Hi, I have made these cute chicken pincushions, and would you guess, I can’t find the pattern and our Pastor’s wife asked me this morning, to make more for her for gifts. she bought all we had at our church bazaar this Nov. thank you soooo-much for sharing your pattern, bless you for saving me…………
Linda
March 30, 2010 — 4:26 am
I have made these b4-using washed sand to fill them gives nice weight, plus it sharpens the pins/needles – they sell fantastic @craft sales
Doris
September 13, 2010 — 5:50 am
Thanks for the pattern. I made several for a church sale project, but I made quilted fabric to make them out of, made with 1 1/2 in. strips.
Karen
October 16, 2010 — 2:53 am
Saw these chicks as a mobile. Heavy beaded string went down thru each chick, knotted so they stayed a few inches apart. At the end were a couple of feathers and a bell. Soooo, cute-now I can make one myself. Thanks for being soooo generous. 🙂
val
February 26, 2011 — 2:14 pm
love it, thanks for sharing! (I made them teeny and turned them into Christmas ornaments)
Leila
June 20, 2011 — 8:35 am
Love this pattern and thanks so much for the info.
rho
July 26, 2011 — 5:00 am
Thanks so much for this. I too, have been looking for this pattern for a long time. I’ve been given a couple of these chicken pincushions, but I’ve ALWAYS wanted to know how to do them myself! Now, I can, thanks to you!
Jayne
January 10, 2012 — 6:22 pm
Thank you for sharing this pattern, I’m going to try a few variations when i get my machine out at the weekend. Hopefully I’ll be able to share this with you and others.
Paula
August 6, 2013 — 8:16 am
Thank you sharing. I can’t wait to make one for myself and crafter friends.