Category: Computers

  • Leaving Instagram

    Edited (6/2/25) to add: I figured out how to do error checking! I’ve included details below and updated the shared Shortcut.
    Edited (3/2/25) to add: I had the file encoding command incorrect below! It’s now correct.

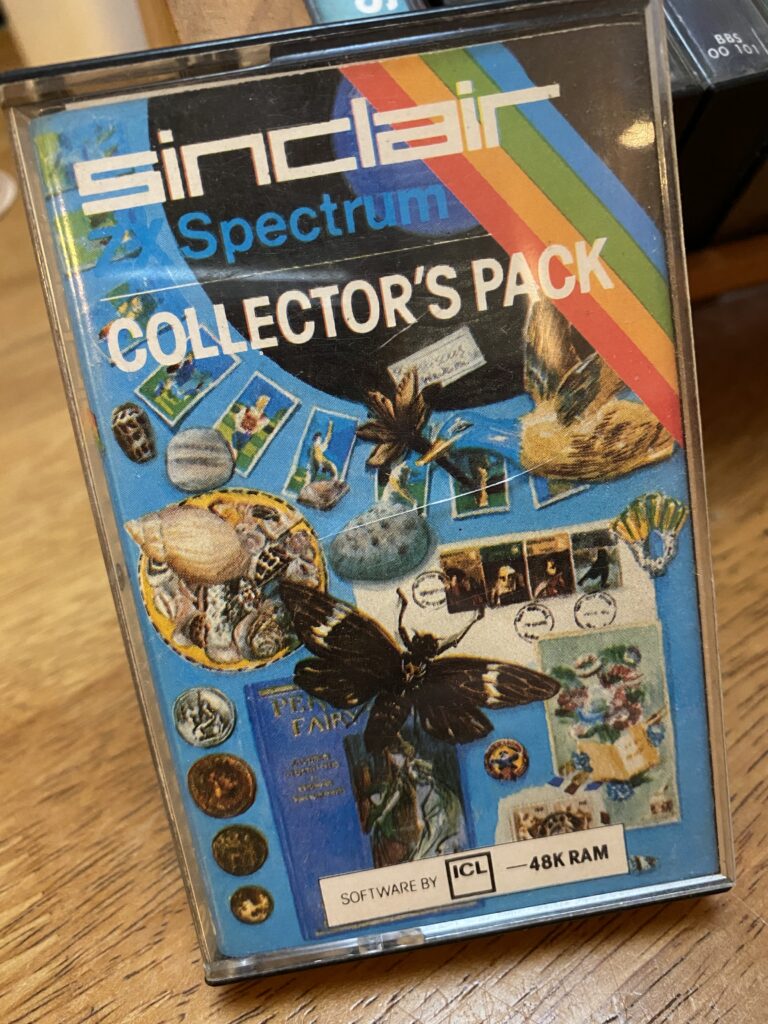
    Everybody’s got a line, and Meta crossed mine a while back. It’s time to extricate my data and my attention from their greedy, fascist-enabling claws. I spent the last couple days using an Apple Shortcut to migrate all of my Instagram posts over to WordPress posts on this blog, and I’m in the process of shutting down the Insta account entirely. If you’d like to do the same, I’ll show you how.

    Why a Shortcut? Well, I did some research first to see if there was a plugin or service that could migrate the posts for me. Unfortunately, I didn’t find much. This plugin on Github looked like the perfect thing, but it hasn’t been updated in six years since Instagram got it shut down. I also found Intagrate – and would have been willing to pay for it – but spotted this alert at the top of the page: “Due to Instagram API changes, only Instagram Creator and Business accounts can be connected to the plugin.” Most likely that means I wouldn’t have any luck trying to use the API myself, either by fixing the old plugin or writing my own.

    And then I thought about the Apple Shortcuts I wrote recently for making posts straight from my phone. I already know how to upload media to WordPress and then use it to create posts. Why not use that to do the export? I just needed my Instagram data in some format that the Shortcut could parse.

    Step 1 – Request my Instagram archive

    To get to my Instagram data, I had to go to the Meta Accounts Center and click on “Your information and permissions.” Then I clicked on the “Download your information” option. Then I clicked on the “Download or transfer information” option in the box that pops up. I selected my Instagram profile and “Some of your information.” Then I selected the option to just download my “Content.” (There’s a ton of other information in there like Fundraisers and Followers and Messages and whatnot, but I only cared about my content.) Then I selected the option to “Download to device.” The final step was to select my download options:

    Instagram download settings

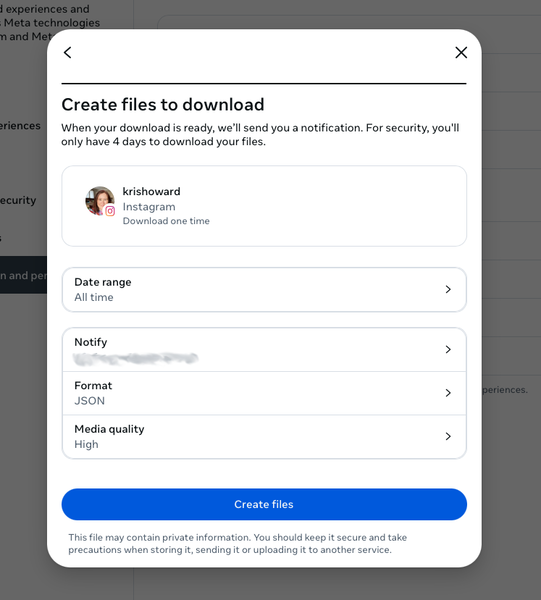
    I requested “All time” for the date range, “JSON” for the format, and “High” for the media quality. Once I submitted the request, it took a little while for the file to be prepared. They sent me an email once it was ready and I downloaded it.

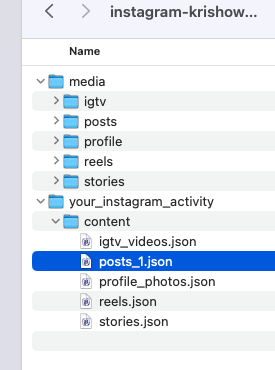
    The archive itself is pretty straightforward. The details of all my posts were in your_instagram_activity/content/posts_1.json. All of the actual images were in media/posts and then organised in folders by month/year.

    Instagram archive

    Step 2 – Prepare the JSON

    Once thing I noticed when I looked at the JSON in a text editor was that the encoding was clearly messed up. I could see posts where I had used emojis instead looked like this:

    "title": "I was excited yesterday to find at a Mittagong antique shop a set of 6 placemats depicting artworks from the famous Australian artist Tom Roberts. Mr. Snook was similarly excited to find a red metal EAT napkin holder for $2 at the Vinnies. \u00f0\u009f\u0098\u0082\u00e2\u009d\u00a4\u00ef\u00b8\u008f",

    I’m not an expert at fixing encoding issues, so I asked Rodd to help. We tried changing the encoding in BBEdit, but nothing seemed to fix it. He went away and did some digging and figured out I needed to use iconv and jq. Here’s the Terminal command that worked:

    cat posts_1.json | jq '.|sort_by(.media[0].creation_timestamp)|reverse' | iconv -t iso-8859-1 -f utf-8 > posts_1_fix.json

    And now when I opened posts_1_fix.json I could see the emoji properly:

    "title": "I was excited yesterday to find at a Mittagong antique shop a set of 6 placemats depicting artworks from the famous Australian artist Tom Roberts. Mr. Snook was similarly excited to find a red metal EAT napkin holder for $2 at the Vinnies. đŸ˜‚â€ïž",

    The other thing that command does is to reorder the items in the JSON. For some reason, the file was not organised by timestamp. (I thought at first some items were missing and thus did several more downloads before I realised that all the content was there, just jumbled about.) Most people probably don’t care about the order, but in my case, it’s because for several years I had a plugin that automatically pulled in my Instagram posts each day to my blog. That meant I needed to delete several years worth of posts in the middle of the JSON to avoid having duplication. I simply used Epoch Converter to get the timestamp of the first and last posts that I imported in this way, and then deleted the items that fell within that timeframe.

    Another thing – my Shortcut only handles images. It’ll skip over any videos, which come through as mp4 files. I don’t usually post these, so my approach was to handle them separately. I simply went through the file searching for them to see if they were worth moving over to YouTube and embedding on the blog, and then deleted those items. You can choose how you want to handle them.

    Lastly, I discovered that Shortcuts would only parse the JSON if it had a .txt extension. So I copied the first 1000 lines or so of it (I’ll explain why in a minute) into a separate file and called it “posts_scratch.txt”, keeping it in the same folder as “posts_1.json” and “posts_1_fix.json”.

    Step 3 – Set up the Shortcut

    You can download the Shortcut I created here. I’ll walk you through it bit by bit.

    Authorisation

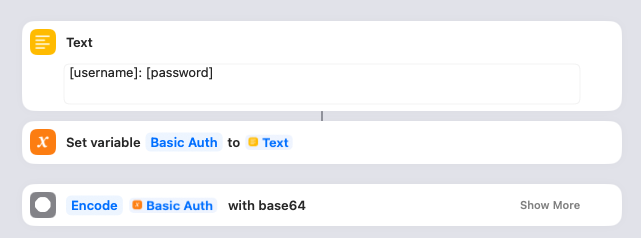
    This is where you give the Shortcut the details it needs to access your WordPress blog. You’ll need to create an Application Password and then put the username and password into the Text box as shown. The Shortcut saves that in a variable and then encodes it.

    Initialise permalinks and errors

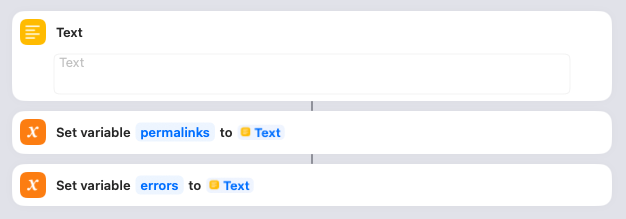
    In order to show a list of all the posts that have been created at the end of the import (as well as any errors that have occurred), I create blank variables to collect them. Nothing to do here.

    Parse the JSON

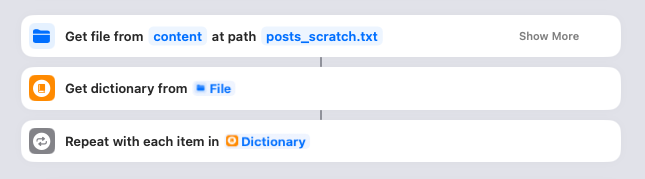
    This is things really get going. You need to click on that “content” link and ensure it points to the content folder in your downloaded Instagram archive. When you run the Shortcut, it’ll look in that folder for the “posts_scratch.txt” file and parse it, with each Instagram post becoming an item in the Dictionary. The Shortcut then loops through each of these.

    Initialise title and content

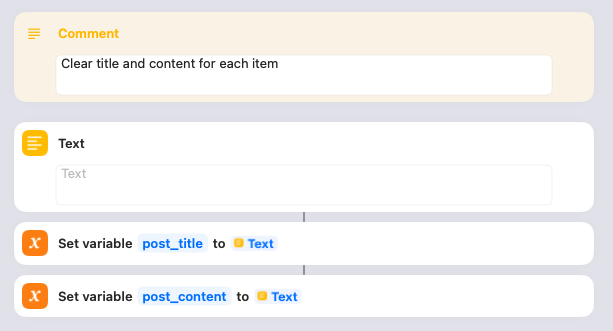
    For each Instagram post, I set a blank variable for the post_title and post_content. Nothing to do here.

    Get title

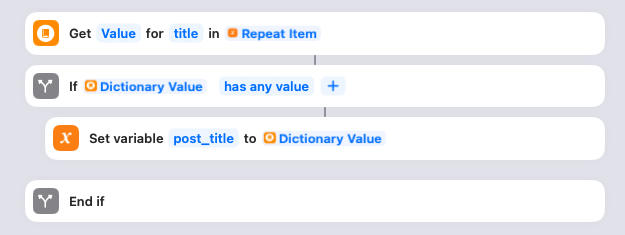
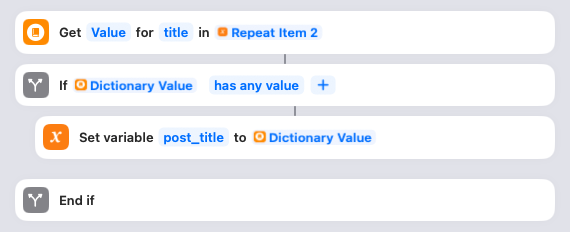
    Next the script looks to see if there is a title specified for the Instagram post in the JSON. Note: the JSON file handles this differently depending on whether it’s a single image or multi image post. (No idea why; the consistency is stupid. 🙄 ) This case is for a multi image post. If the title is specified, it gets saved to the post_title variable. Nothing to do here.

    Loop through media

    Next the script grabs the media associated to the Instagram post. It then starts looping through each media item attached. Nothing to do here.

    URL and timestamp

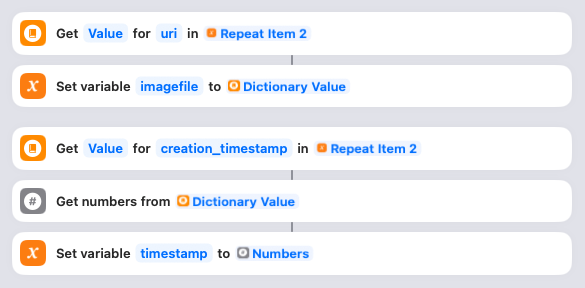
    For each media item, it grabs the URI specified in the JSON and saves it in the imagefile variable. It also grabs the timestamp, converts it into a number (rather than a string), and saves it in the timestamp variable. Nothing to do here. (Yes, I know that I’m doing this over and over for each image, even though the creation_timestamp is the same for every item in a post. You can fix that if it bothers you. But if such inefficiency bothers you, you’re probably not using a Shortcut for this anyway. 😂 )

    Get the media file

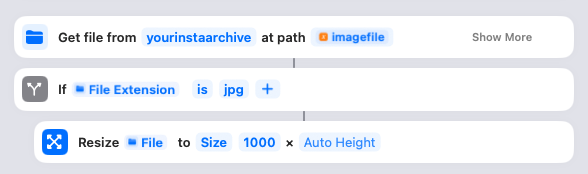
    Here’s where the Shortcut actually gets the media file. You need to click on that “yourinstaarchive” link and ensure it points to your downloaded Instagram archive. The URIs are relative to this parent, so it needs to be correct! Assuming the file is an image, it will resize it to 1000 pixels wide, maximum. (You can adjust that if you want, or take it out to leave them full-size.)

    Get title

    Here’s where the Shortcut handles the case where it’s a single image post. In that case, the title is included with the media item itself. So it grabs that title, and if it has value (i.e. isn’t blank), it saves it as the post_title. Nothing to do here.

    Upload image and check for errors

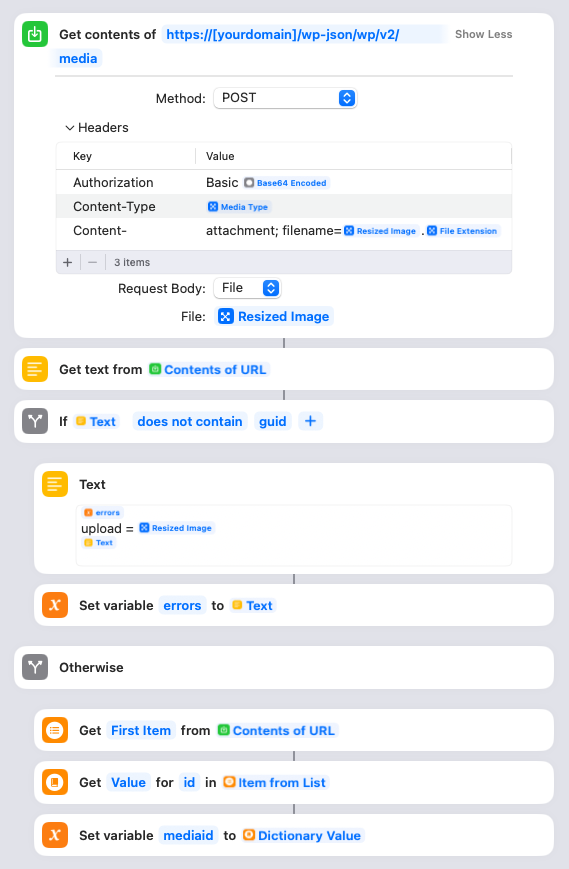
    Here’s where the Shortcut actually uploads the resized media file to your site. You will need to put your own domain name into the URL there. Once the image is uploaded, the Shortcut will parse the response from your site and check if there’s an error. All successful responses should have “guid” in there, so if it’s not, it’ll save the name of the file it was trying to upload into the errors variable. If the upload succeeded, it’ll instead save the ID of the newly uploaded image in the mediaid variable and progress to updating the alt text and title.

    Post content

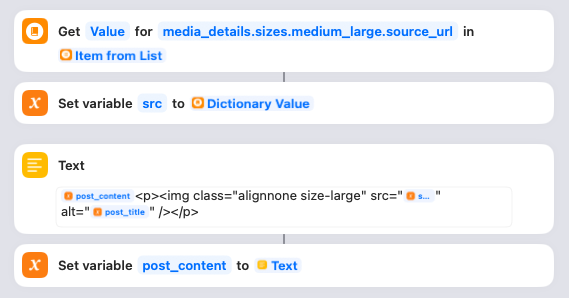
    As part of the response, WordPress will send back the URLs for all the different resized versions of the image. The Shortcut will grab the “medium_large” version, which is the fixed width 768px wide version and save it as the src variable. (You can change the image size if you want, but that’s left as an exercise for the you. None of this stuff is well documented, I’m afraid.) The Shortcut will then create the HTML to display the image and save it in the post_content variable. Because of the way the Text item is set up, as you recursively loop through each image in the post it’ll be appended as a series of paragraphs. Feel free to change the HTML to suit your blog if you want, otherwise nothing to do here. (At a later step, it’ll inject the actual text from the Instagram post.)

    Update alt text and title, and check for errors

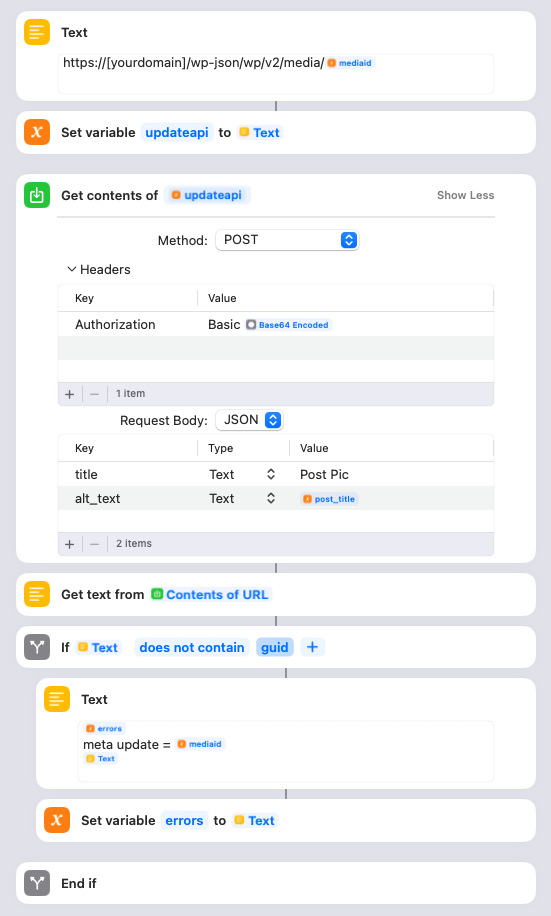
    You need to update the Text box with your blog domain. This step is where the Shortcut updates the title and alt text of the image it just uploaded. The title is set to “Post Pic”, but you can change that to something else if you like. The alt text is set to the post_title variable. If this update fails, the mediaid is logged to the error variable.

    Close if statements and wait 5 seconds before looping

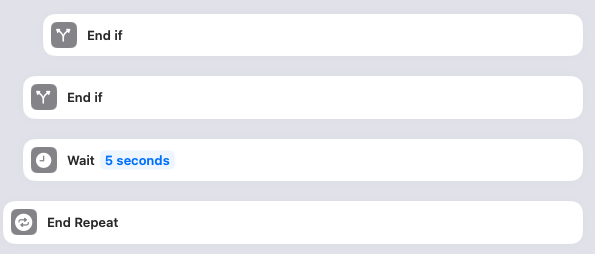
    This closes off the two If statements (whether it was a JPG or not, and whether the image upload succeeded), waits for 5 seconds, and then loops to the next media item in the post. You can remove the Wait if you want, or experiment with how long you want it to be. I added it because I know my site struggles under heavy load, and I wanted to spread out the API requests to be safe rather than just blasting them as fast as my MacPro can generate them. Otherwise nothing to do here.

    Convert the date

    This is where the Shortcut turns the timestamp into an actual date that WordPress can work with. (No, I don’t bother doing anything tricky to handle the timezone, as I don’t need that level of precision on my posts.) Nothing to do here.

    Post caption

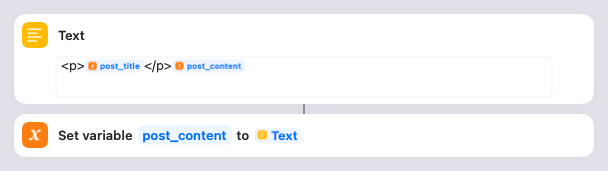
    Here’s where the Shortcut injects the Instagram post caption at the start of the post_content variable, which at this point is a list of HTML images. You can adjust the HTML if you want, otherwise nothing to do here.

    Upload the post and check for errors

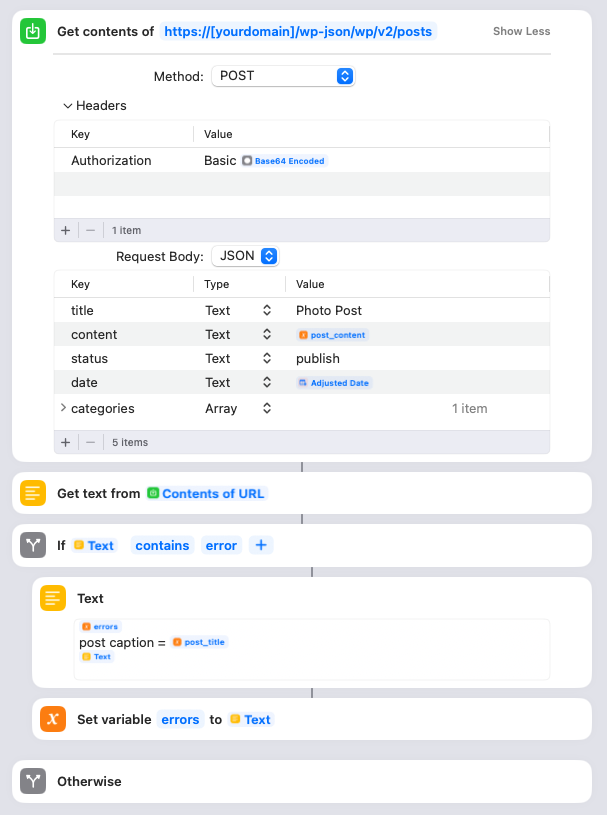
    Here’s where the Shortcut actually creates the WordPress post. You need to adjust the URL to have your domain name. It uses the encoded username/password we created way up at the start. I set it to use “Photo Post” as the WordPress post title, but you can change that to whatever you want. The content is the post_content HTML that was created, and the date is the converted timestamp. I also assign the post to a special WordPress category. You can either remove this, or change the category ID to the appropriate one from your site.

    Also please note that I’ve set the status to “publish”. This means the posts will go live in WordPress right away, but since the publish date is in the past they won’t appear on your home page or in your RSS feeds. You may wish to change this to “draft” the first few times you run it. I found though that when I went into WordPress to check and publish those posts, it updated the published date to the current date – meaning the post no longer appeared at the correct date in the past, and it showed up in my RSS feed as a new post. So once you’re satisfied that the script is working, I suggest changing it to “publish” directly and then they’ll be saved with the correct date.

    The Shortcut will also check if there were any errors returned upon publishing the post, and if so save the caption of the post in the errors variable.

    Get post response

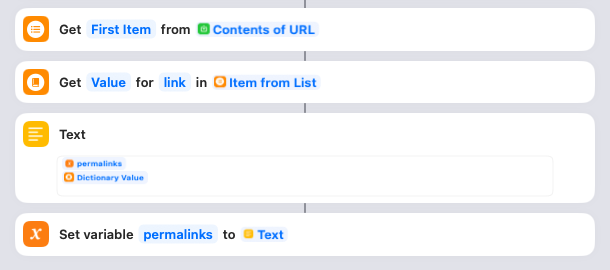
    If there were no errors, the Shortcut next parses the response from the WordPress API and pulls out the link to the post that’s been created. It then gets appended to the list saved within the permalinks variable. Nothing to do here.

    Final step

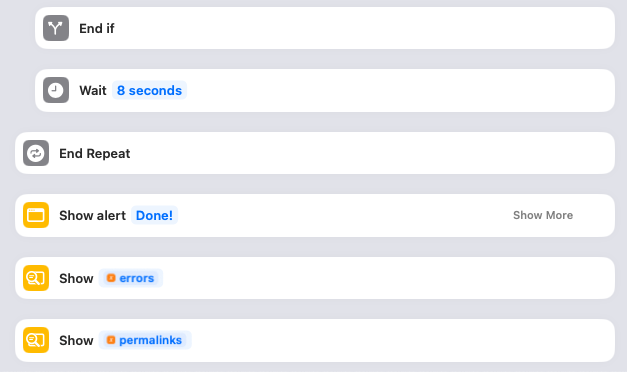
    Final step! Again, I have a “wait” set after the if statement finishes just to space out the post loops. You can remove this, or adjust as necessary. Then the whole thing loops back around to the next Instagram post in the JSON. Once the loop is finished, it’ll show an alert box that says “Done!”, then one with any errors that occurred, and then another with the list of permalinks. This allows you to investigate and fix any of the errors, and to spot check some of the permalinks to make sure they look correct. Note: The error checking may include some false positives, if you actually used the word “error” in the post! So if it looks fine on your site, you can disregard that error.

    Optionally, you could use the Shortcut action “Append to Text File” or “Append to Note” if you want to write those errors or permalinks to a file. I leave that as an exercise for you to work out. 🙂

    Step 4 – Run the Shortcut

    Once I had the Shortcut properly configured, I copied out just a small portion of the fixed JSON into my posts_scratch.txt so I could test it. To run it, I just clicked the “Play” button on the Shortcut. Shortcuts will highlight each step as it moves through the flow. Once I was satisfied it was doing what I wanted, I increased the number of items in my posts_scratch.txt file.

    Why not just run the whole thing? Well, I found it crashed every now and then. I’m not sure why – whether it was a memory issue with Shortcuts, or my server being flaky, or WordPress itself just throwing an error. That’s why I started adding some “wait” pauses in there, and why I found it easier to work in smaller batches. Whenever it crashed, I could look in my WordPress dashboard to see the last Media item that had been uploaded, and then find that point in the JSON and delete everything before that item. Then I’d delete the Media item in WordPress and start the Shortcut over again at that point. 1000 lines or so seemed to be the sweet spot, but you need to make sure you aren’t cutting off one of the items in the JSON, of course.

    Update: The above was written before I figured out how to add error checking to the Shortcut. Now it should run without actually crashing the Shortcut, logging errors to a variable. I would still be wary about running a really large file, as I have no idea how Shortcuts would handle that…

    One last heads up – you’ll probably get a lot of Permissions requests from your Mac at first due to the large number of files you’re transferring. I just kept clicking the option to “Always Allow” and eventually it stopped asking.

    After the import…

    As mentioned, this Shortcut only handles JPGs, so I then went through the original JSON file looking for mp4 files to decide what to do with them. Some of them I discarded, and others I uploaded to YouTube and manually created posts for them.

    I also searched through my existing WordPress posts for any places where I had previously embedded or linked to Instagram images. (Search for “instagram.com” or “instagr.am” to find these. I also had some that were done with IFTTT, so a search for “ift.tt” will find those.) I either replaced those with links to my posts, or removed them as necessary.

    Finally it was time to remove my content off Instagram. I didn’t want to nuke my account yet, which meant I needed to delete the images one by one. (There are apps that claim to do bulk delete, but I didn’t like the look of any of them.) To do this, I went to “Your Activity” -> “Photos and videos” in a browser window. Then click “Select” and start clicking away. Once you hit 100 (the maximum), click “Delete” to blast them.

    I’ll give it a few weeks or so before I delete the account entirely, to make sure folks know where to find my content going forward!

    Next up…. Facebook. *cracks knuckles*

  • Facebook detox

    In addition to demonetising my Meta data, I’ve decided to take a break from Meta platforms this week. It turns out that it’s surprisingly difficult to log out of Facebook Messenger on your phone, to the extent that I had to dig up a Wikihow article to show me how. Even after I managed to log out of Facebook, Messenger, Instagram, and Threads, they kept showing me a single-click “log back in” option due to some saved profile, which I then had to delete. The fact that they make it so damn difficult kinda reinforces my decision, to be honest.

    The only one I haven’t signed out of is WhatsApp. This is solely because my main friend group uses it to communicate, and I haven’t yet figured out how to convince them all to move to an alternative.

    Why just a break? Why don’t I delete my accounts? The temptation is definitely there. Sadly, FB remains my main channel to keep up with my family and friends in the US. It’s where I see what my brother and sister-in-law are doing with their cafe this week; it’s where I see whatever dodgy Jeep memes my Dad is laughing at; it’s where I see whatever quilt show in the Midwest my Mom is supporting; it’s where I find out if my college friends in LA are still safe. Instagram is literally the only way I know what’s happening with my young nieces and nephews, who would never be so crass as to text me or talk on the phone. It’s hard. I suspect the way forward will just be to cut my usage way, way back, and to move towards a read-only method of interaction there.

  • Problems with WordPress and Amazon CloudFront

    Problems with WordPress and Amazon CloudFront

    Here’s a fun story. When I originally moved this blog to Amazon Lightsail five years ago, I followed the recommended best practice and installed the AWS for WordPress plugin. I used that to set up an Amazon CloudFront distribution to manage the site’s cache. For several years, everything worked great. Then in September 2022, AWS abandoned the plugin and removed it from WordPress.org. As far as I can tell, they provided no information for users to tell them what to do without it. I continued to use the plugin for sometime, even though this is generally seen as pretty bad security since it’s no longer receiving updates. A few months back, I got tired of my Security scanner blaring at me about this discontinued plugin and deactivated it. The CloudFront distribution still existed and my site continued to work as intended, so I figured it was safe to delete.

    As you might guess, there have been consequences. I noticed recently that my site was sometimes caching things too aggressively. I’d write a new blog post and tell Rodd to check it out, but he’d still be seeing the old one for some time. I’m far from a CloudFront expert, but I’ve been looking at my distribution behaviour settings and comparing them to current best practices. This site, for example, recommends using “Origin” for your cache key. My plugin-created distro however uses “Cloudfront-Forwarded-Proto,” “CloudFront-is-Tablet-Viewer,” “CloudFront-is-Mobile-Viewer,” “CloudFront-is-Desktop-Viewer,” and “Host.” For object caching, my distribution had “Use origin cache headers” selected instead of a custom option. Without any documentation from AWS on how their plugin actually worked, all I can theorise is that it must’ve set some sort of header that CloudFront was using, and by deleting the plugin, I’ve mucked up that behaviour.

    So what to do? For the meantime, I’ve changed the default behaviour object caching to have a default TTL of 5 minutes. I’ll see if that helps the situation at all. Otherwise I’m going to either have to look at my backups and see if I can reverse-engineer what the plugin was doing, or else figure out how to modify my distribution to work properly without it. Ugh.

  • Demonetising my Meta data

    Mad at Meta? Don’t Let Them Collect and Monetize Your Personal Data | Electronic Frontier Foundation

    I just went through and checked all of these settings. Not only is Facebook a privacy nightmare, Zuckerberg’s pivot to right-wing broligarch is sickening. I’d delete my accounts entirely except it’s my main way of communicating with some family members back in the US. At least I can limit how much I contribute to their coffers.

  • Carbon dioxide

    Mr. Snook has been after a carbon dioxide monitor for some time now, worried that our new insulated windows are actually killing us. He ordered this one in the Boxing Day sale, and it’s just arrived today. So now he’s walking around the house going “TWELVE HUNDRED IN THE LIVING ROOM! WE NEED TO VENTILATE!” Forecast today is for 33C/91F. Fml. đŸ€Šâ€â™€ïž

  • iOS Shortcuts for WordPress Bloggers

    You may have noticed I’m posting a lot more lately. It’s partly because I’m not working, plus a bit of conscious effort… plus a couple effort-saving shortcuts I’ve set up.

    In the past, I used to share images to Instagram and then had an IFTTT applet run to post those images to WordPress as blog posts. I wanted to flip that model and instead first post to my own site, and THEN have the option of sharing to Instagram or other social networks. The solution I’ve landed on is to use an iOS Shortcut as a Share Sheet action. That means I take a photo, click the Share button, and then click the Post with Pic shortcut.

    iOS Shortcuts

    The Shortcut first prompts me for a Post Title, Post Content, and Image Alt Text. It then converts the image to a JPG and uploads it to the WordPress Media API along with the title and alt text. Next, it creates a new post with the title and content, and sets the newly uploaded image as the Featured Image for the post. It also copies the Post Content to the clipboard and reopens the Share Sheet in case I want to then post the image to Instagram or any other social networks. Lastly, it opens my site so I can see the new post.

    Post with Pic ShortcutAs you can see, it’s a pretty lengthy Shortcut. You can download a blank version for yourself from here. There are a few places you’ll need to tweak and customise for your own setup. (I recommend doing that on your laptop rather than trying to do it on the phone directly.) You’ll first need to set up an Application-Specific Password for your WordPress User. There’s a Text action where you’ll need to put in your WordPress username and that application-specific password for authentication. There are also three places where you need to replace [yourdomain] with the URL to your own site. Once you’ve got it updated, click the Info icon and make sure you’ve checked “Show in Share Sheet.” Then you should be good to go! (I built this based on Chuck Grimmett’s Shortcut and helpful blog post.)

    And yes, I know that Shortcuts has a “Post to WordPress” action built in. However, I could not get the damn thing to work! I suspect it’s because it uses XML-RPC, and I have that locked down for security. This version with the Rest API works just fine.

    Upload Images to WordPress ShortcutThere’s a second Shortcut in the Share Sheet above: Upload Images to WordPress. This is for when I have a number of images I want to use in a post. You can upload through the WordPress iOS app, but I’ve found it clunky and slow. It also defaults to uploading at full resolution too. This shortcut works a lot better. I simply select several images in the Photos app, hit Share, and then the relevant Shortcut. It converts each one to JPG and resizes to 1000px wide before uploading. You can grab it here. Again, you’ll need to put in your username and application password. You’ll also need to put your domain name in for the API URL. You may also need to give it some permissions the first time you run it. Depending on how powerful your server is, you may need to limit how many photos you try to upload at once. Note: this one doesn’t do any titles or alt text. But this is for bulk uploading, and I then add in the metadata when I’m composing the post itself.

    I hope you find these useful!

  • ZX Spectrum games

    There’s a Metafilter post today about the Sinclair ZX81, which reminded me of one of my Twitter threads from 2020 that got deleted when I shut down my account. We were packing up the house for the move to Germany, which meant Rodd was cleaning out his office. And suddenly he unearthed this rack of cassette tapes…

    ZX Spectrum games

    It turns out that Rodd’s sister’s partner Chris was a big ZX Spectrum enthusiast back in the day, to the extent that he became a reseller of local and imported software for it. (For the youths, the Spectrum was introduced in 1982. Instead of disk drives, software was saved onto and loaded from cassette tapes.) Chris eventually gave his old Spectrum to Rodd with a lot of cassettes. Rodd later gave the computer back, but he kept the tapes for some reason. There were some absolute gems in there.

    Planetoids

    Planetoids! (And also Missile.)

    Cassette for Planetoid game

    “PLANETOIDS – an exciting, real-time reactive machine-code game in which you must destroy and avoid the passing planetoids in space. Beware of the lurking alien ship which can destroy you with its cluster bombs. In full high-resolution colour with sound effects.”

    3D Tunnel

    3D Tunnel. I love the artwork here. It looks like something a kid would draw on their notebook in biology class. Also, wow, $25 AUD would have been a fair bit back then!

    Cassette for the 3D Tunnel game

    “Another fast moving 3D game from the author of the 3D Monster Maze and Defender for the ZX81. Flapping bats, scurrying rats, leaping toads, crawling spiders all appear live in the 3D Tunnel. The last object is . . . . . . . . . . . . . . !”

    Inca Curse

    Adventure B: Inca Curse. I’m guessing Raiders of the Lost Ark had made quite a big impression on a lot of kids.

    Inca Curse cassette

    “In this adventure you find yourself in a South American jungle near an as yet undisturbed Inca temple. Your aim is to get out of the temple with as much treasure as you can and your adventure is complete when you have returned to the jungle clearing.”

    JGC Presents Famous People Play Poker

    JGS Presents Famous People Play Poker. I think the crappier cover art here is reflected in the bargain price.

    Poker Game instructions

    Here’s the instructions. I really wish it had listed who the “famous people” were!

    UPDATE: In April 2025 I was contacted by Prof. Paul X McCarthy, who was one of the two creators of this game! He shared some details about it, including who the famous people were. You can read his email here.

    General Election

    And now we come to the more niche games: General Election.

    General Election Instructions

    I am trying to imagine the person who would have been excited by this game.

    Collector's Pack

    Collector’s Pack. This one isn’t a game; it purports to be actual useful software!

    Collector's Pack cassette

    “This comprehensive program allows collectors of stamps etc to hold e.g. 1500 records of up to nine items on one cassette and keep the details up to date, examine the details held and keep the records sorted into order.” On the other hand, I can exactly imagine the person who would be excited by this application.

    Biorhythms

    Biorhythms. Hilariously, one of the first programs I ever wrote for myself was a biorhythm calculator on my TI-85 calculator in high school.

    Biorhythm cassette

    “When will you be at your peak physically, emotionally and intellectually? Find out all about biorhythms through this easy to follow computer explanation. Get your computer to work out your biorhythms and those of your friends.”

    Biorhythm instructions

    You don’t get a lot of installation instructions on these cassettes. I do like that they tell you it takes nearly a full minute to load each program!

    The Hobbit game

    And here is the jewel in the collection: THE HOBBIT. “The Hobbit is a super-program that is a milestone in computer software. You will face dangers, excitement and adventure in words and graphics. Meet all the characters from The Hobbit and talk to them in ordinary English! The Hobbit program brings you the future in an exciting and challenging fantasy!”

    The Hobbit comes with a pretty significant instruction booklet, and I scanned a few of the pages. The developers even invented their own DSL called Inglish that allowed the player to type full sentences. I particularly liked this disclaimer at the end:

    Hobbit disclaimer

    “Due to the immense size and complexity of this game it is impossible to guarantee that it will ever be completely error-free. A great deal of time has been spent testing this program to ensure it will behave as described within these instructions. If, however, any problems are found we would like to know about them so that future versions may be corrected. We would also like to hear any comments or criticisms you have about the game.”

    I found that very charming, and I ended up doing more research about the game on Wikipedia. It turns out that it was produced by Melbourne House, an Australian video game development studio. I noted with excitement that one of the designers was a woman, Veronika Megler. When I looked up her page, I was stunned to see that she’s a data scientist at Amazon. Given that I too worked at Amazon (at the time), I couldn’t help but look her up on the internal directory. And there she was! (She lives in the US now.) So what the hell – I sent her a message on the company Slack. She very kindly replied and was delighted to see my photos of her game as well as the others. She asked what we were going to do with them, and I admitted that we had no idea. She made the excellent suggestion that we could donate them to ACMI (The Australian Centre for the Moving Image), who have an ongoing effort to preserve old video games. We agreed, and she hooked us up with a friend of hers there and we ended up shipping them to Melbourne.

    Pretty neat, eh?

  • YOW! 2024

    As you may have gathered from some of my posts earlier in the month, this year I was invited by the folks at YOW! Conferences to come along on the tour as part of the team. I introduced the opening and closing keynotes in each city, hosted a track in Brisbane, and helped fill in with odd jobs where necessary. Along the way, I managed to see almost every single speaker on the agenda this year. I thought I’d share a photo and takeaway from every session I saw, to give you a flavour of the breadth and depth of content at YOW events. (These talks were all recorded and they’ll be up on YouTube in the new year.) We kicked off with Day One in Melbourne…

    Nilesh Makwana presenting at YOW

    Nilesh Makwana is from Perth and keynoted at all three conferences. His focus is on digital inclusion – how can we ensure that, when we build the glorious digital future, we don’t leave people behind? I was especially interested to hear about his work with the WA government on their Digital Inclusion Blueprint.

    Suz Hinton presenting at YOW

    I was super excited to hear from Suz Hinton, who I first met at a YOW event back in 2017. Suz always does something interesting, and this time she shared with us her project to use an ant farm to generate entropy for use with encryption. I knew about lava lamps, but ants are next level! One thing I learned is that ants don’t sleep like humans; they just take micro sleeps throughout the day. (As a result, Rodd and I now refer to “taking an ant nap” anytime one of us is tired and needs a rest.) I also learned a fair bit about encryption and how computers generate randomness from her talk.

    Giacomo Cavalieri presenting at YOW

    Next was my very stylish friend Giacomo Cavalieri, making his first trip to Australia. Giacomo is one of the core developers of Gleam, a new functional programming language. While I’m not a professional (or even amateur) programmer these days, I really liked how Giacomo talked about the importance of having a friendly developer experience. He certainly convinced more than a few attendees to give Gleam a shot!

    Andrea Magnorsky presenting at YOW

    This was from my friend Andrea Magnorsky‘s session on “bytesize architecture sessions.” I met Andrea not long after she moved to NZ earlier this year and even got a preview of one of her talks, so I knew she’d have a lot to offer the YOW audience. She talked about the difficulties in sharing information across teams, and she pitched her architecture session idea as something that can really help. She gave everyone practical advice for running a session and talked about the importance of having psychological safety and a growth mindset.

    Yan Chernikov presenting at YOW

    This guy is Yan Chernikov, aka Cherno. He’s a YouTuber and a developer, and right now he’s working on a long-term project to build his own gaming engine called Hazel. He talked us through his goals for the project: to have a fun challenge; to have content to teach people on his videos; and to eventually make his own game. While there are legit reasons for using off-the-shelf software, it can be overly complex and expensive. Yan talked about how he’s able to leverage Open Source libraries and work within constraints to make Hazel faster and simpler than the alternatives.

    Ben Sadeghipour presenting at YOW

    Ben Sadeghipour also goes by NahamSec, and he’s a full-time hacker, pen tester, and content creator. For the last few years, he’s made over a million dollars from bug bounty programs. Ben introduced us to the White Rabbit Neo LLM and showed us how he uses it to help hack into insecure systems. LLMs can assist with asset discovery, sifting through thousands of subdomains to identify targets. It can also help him generate testing data for Insecure Direct Object Reference bugs, as well as code for exploiting security holes like Java’s “zip slip” hack. It was an entertaining but slightly scary talk, as everyone got a peek at some of the tools being used by both the white hats and the black hats.

    Allen Holub presenting at YOW

    Kicking off Day 2 in Melbourne was Allen Holub, a software consultant and prolific author. Allen presented with no slides, simply annotating on a shared Miro board as he spoke. He introduced everyone to Larman’s Law, which explains why software companies are inclined to stick to the status quo rather than try new ideas that might benefit them. Allen explained why we need to speak the language of business, which is all about money and risk. Using the example of mob/ensemble programming, he showed how you can build a successful business case for experimenting with it. Big bang adoptions, he warned us, rarely succeed, and it’s impossible to copy and paste process from one org to another.

    Pat Kua presenting at YOW

    Next for me was Pat Kua‘s session on technical leadership. Pat’s an Aussie living in Berlin, and his focus was on the importance of technical alignment. Tech leadership, he said, is all about aligning people in a technical context, and you can do it regardless of your job title. Important skills are empathy, coaching, and conflict resolution. The best way to get started is to look for misalignment and neglect, which gives you a chance to own the issue and demonstrate leadership.

    Joakim Sundén presenting at YOW

    Joakim SundĂ©n is one of the creators of the Spotify model for scaling via agile, autonomous teams. Joakim told us the fascinating story of the development of Spotify’s “Discover Weekly” playlist. The challenge was that even with a search engine and millions of songs available to them, many people (“lean back users”) still needed guidance on discovering new music. They had already developed a custom playlist as part of the “Wrapped/Year in Review” feature, so a team set about experimenting with it. Joakim talked about the many different things they tried, like the frequency, length, and cover art. Rolling it out to the entire user base introduced difficult scaling challenges, but the team had enough data to show that the bet was likely to pay off (and it did).

    Steve Smith presenting at YOW

    Steve Smith gave a deep dive session on Rust, focusing on the borrow checker. Steve said that many folks get excited about Rust but get stuck when it comes to garbage collection. Rust, he says, forces you to do the things you always said you were doing (but weren’t). This one was way over my head as a Rust newbie, but it’s always great to see someone really get deep into the technical weeds on a particular topic.

    Edith Harbaugh presenting at YOW

    Edith Harbaugh is the co-founder of LaunchDarkly, and her focus was on feature flags and how you can use them at every stage of the software development lifecycle. Feature flags can be used to gauge demand for a new feature, or to give early access for trusted beta users. They’re also useful for controlled release if you have a good feedback mechanism to spot when they are problems (like with the Crowdstrike outage), or to allow customers to opt in/out of bleeding edge deployments.

    Holly Cummins presenting at YOW

    The closing keynote at YOW Melbourne was from Holly Cummins, who works at Red Hat on the Quarkus team. Holly’s talk was all about efficiency, and how it’s killing both the world (in terms of waste and climate change) as well as us (in the form of burnout). Holly shared simple solutions to reducing waste, such as “LightSwitchOps” – her name for “turning things off when you’re not using them.” This can save you a lot of money and tests your resilience as well. She also spoke about the importance of efficiency in our code, and she pointed out that AI – which promises big efficiency gains – has a bias towards verbosity that can lead to code bloat. I loved the part of her talk about the importance of slack for human beings, which means idle time to rest our brains and sleep. Idle brains solve problems!

    David speaking at YOW Brisbane

    And then we were off to Brisbane! After the keynote, I went to David Khourshid‘s session on diagrams. David talked about the importance of different diagrams in making complex software more understandable for human beings. He gave a ton of examples and recommended tools, and promised that he wouldn’t traumatise us all with UML. 😂 To make a good diagram, he said, you need to think about the intent (why?), the audience (who?), and the scope (what?). The biggest mistakes people make with diagrams are drawing pointless, unlabelled arrows everywhere, and giving too much or too little detail. If we took nothing else away, he urged us to “LABEL YOUR ARROWS!”

    MishManners presenting at YOW

    Next I went to the very popular session on skills for the AI age by Michelle “MishManners” Duke. During times of big technological upheaval, she said, people always worry about their jobs. It happened during the Industrial Revolution, and it’s happening now. She said that the skills that will be needed by workers in the future are persuasion and negotiation, decision-making and ethics, adaptability, empathy and EQ, collaboration, creativity, and the ability to learn. The best way to develop career resilience is to use the tools yourself and keep up-to-date with what’s happening in the field.

    Thomas playing the piano at YOW

    The second AI talk of Brisbane for me was Thomas Vitale‘s highly entertaining “concerto for Java and AI”. Thomas’s side hobby is musical composition, and he showed us an example of building an application to help soundtrack composers using Spring AI. Along the way, he covered topics like mitigating malicious prompt injection, semantic search, vector stores, and retrieval augmented generation. As his finale, he used his application to help generate music for an action movie set on Mars! Very fun.

    Rod presenting at YOW

    My third AI talk of the day was Rod Johnson‘s on building an AI chatbot using Spring. Since he’s the creator of Spring, I was excited to see that he was mostly doing live coding for the whole session. Enterprise developers, he says, have an important role in making AI actually usable. One really useful tip he gave was to make use of Ollama, which allows you to run open source LLMs locally. He also talked about advisors and showed how they can be used to build a “toxicity guard” to keep your application away from topics you don’t want to address.

    Rasmus presenting at YOW

    I needed something to counter all the pro-AI talks, so I was glad to attend Rasmus LystrĂžm‘s session on “how to lead AI transformation.” Rasmus said leaders need to ask themselves hard questions, like what are we racing towards and why? There’s a lot of FOMO and FUD around. He walked us through the approaches organisations can take towards AI, from waiting it out (your employees will just go around you and leak your data anyway); building your own (a hopeless endeavour as you can’t possibly keep up with the pace of innovation in the industry); creating an AI center of excellence (which is really just creating a new silo in your org); or signing up for a paid service (possibly low ROI and productivity gains). You can’t just announce a new tool, Rasmus said, you have to re-organise your entire company if you want to adopt AI and move towards full-stack, empowered teams.

    Theodora presenting at YOW Brisbane

    Theodora Bock was unable to travel, but she still delivered an entertaining (live!) presentation from her home in the US. She said that games are very good at education, and that learning is often an unintended consequence of play. She explained to us a project she worked on to create a gamified experience to teach astronauts how to use an ultrasound wand for the upcoming Artemis missions. It’s more interactive than reading a manual, and allows you to craft a progression curve as people learn. This was a fascinating topic, and she gave us several demos of the game she worked on. Very cool!

    Lu presenting at YOW Brisbane

    Lu Wilson had one of the most entertaining sessions on the whole agenda, starting with an explanation of how computer interaction models always seem to start with text and then move to a graphical canvas. But how will LLMs move to the canvas? Lu showed us many demos and experiments from their work at tldraw, like drawing a UI and then turning it into a working prototype with only the click of a button. Lu showed us all that we don’t really know yet what AI will look like beyond chat, but there’s a lot of fun stuff to get excited about.

    Runar presenting at YOW Brisbane

    Next were the talks that I track hosted. First up was RĂșnar Bjarnason, who hails from Iceland but lives in Boston. RĂșnar introduced us to Unison, a “friendly programming language from the future.” He talked about some of the challenges of Microservice architectures, like complexity of orchestration and deployment, added latency, and protocol versioning. Most of Microservice architecture work, he says, is not coding, but rather managing the “meta infrastructure” of builds and deployments. Unison, by contrast, describes complete computation and has dependency resolution baked in via implementation hash. He demoed how to deploy to Unison Cloud, and there was a lot of interest from the audience.

    Marty presenting at YOW

    Next was Marty Pitt, the creator of Taxi and Orbital. Marty started by talking about integration, and that it always seems to involve a lot of glue code that ends up tightly coupling data producers and consumers. His new approach is to build systems that connect on demand to solve a problem with no glue code. Taxi does this by capturing semantic metadata, allowing you to know that “this thing is the same as that thing.” Taxi can be embedded into API specs, and once it’s published, you can build a graph to figure out how to solve a problem. TaxiQL allows you to use semantics to query data, and Orbital is the query execution engine. He gave us a demo of how this worked, and again it seemed like something that was useful to a lot of the attendees.

    Oscar Nierstrasz presenting at YOW

    And now for the final city – Sydney! Oscar Nierstrasz is a retired professor in Switzerland who now works for feenk.com. Oscar told us that one of the problems with legacy modernisation is that systems are opaque, and even if you look at the source code or docs, they might not tell you the full story. Instead you need “moldable development,” which is using analysis tools to get the software to “talk to you.” He demoed some of the features of the Glamorous Toolkit, like using the object inspector to expose domain concepts. It’s all about asking questions and doing experiments.

    Kris Jenkins presenting at YOW

    Next was my friend (and fellow Kris) Kris Jenkins, host of the Developer Voices podcast. Kris’s talk was about types, and how they have a lot of information that can help you talk to your team and analyze your code from multiple perspectives. Kris talked specifically about algebraic data types and gave examples of how they help describe data, relationships, and context. Type signatures give clues to implementation, like revealing structure, flagging problems, and giving clarity of scope. And because they are machine readable, it makes the computer just a part of your team. I really loved Kris’s way of explaining things with lots of examples, and I learned a ton from this talk!

    Trisha Gee presenting at YOW

    I first met Trisha Gee when she presented at YOW many years ago and brought along her new baby. The baby was back with her this year but is now a pre-teen! 😳 Trisha is an IntelliJ IDEA power user, and her talk showed all the tips and tricks she’s learned that help her be more productive and stay in a flow state. Her talk had an interesting overlap to Holly’s keynote, in that she also talked about efficiency and productivity. I was particularly interested to learn about the SPACE Framework, which helps you to get away from vanity metrics. I also appreciated her rant about AI coding companions and whether they actually help you or just increase cognitive load.

    Damian Brady presenting at YOW

    In a neat bit of synchronicity, the next talk was from my buddy Damian Brady from Github. Damian started by talking about the evolution of AI-powered coding tools, and how moving from a separate chatbot to having something embedded in the IDE was really the killer app. Damian’s talk touched on many of the same topics as Trisha’s, including the SPACE Framework. He also introduced us to the Good Day Project, which mapped developer sentiment to Github metrics and showed that deep focus time is the #1 thing developers need to feel productive. Damian then showed a lot of examples of how Github Copilot can help developers save time. My favourite example was explaining regular expressions – those always trip me up.

    Holly Cummins presenting at YOW

    And then, guess what, I saw Holly Cummins present again! One of the speakers had to leave early, so Holly was drafted in to give another presentation. This one was all about optimisation, and getting us to consider the trade-offs in any planned optimisation project. She walked us through a lot of pitfalls and anti patterns, like leaning on intuition and making assumptions, and relying on leading indicators rather than lagging indicators (which are harder to change). She gave practical advice and tools for identifying places for optimisation, and reminded us that performance waste is actually harming the world. (Data centers use 1-2% of the world’s electricity.) So good performance actually makes us good too.)

    Johan Janssen presenting at YOW

    Johan Janssen is a software architect from the Netherlands, and his talk was a speed run through dozens of Java’s “hidden gems” (aka tools and libraries to make your life easier). He demoed loads of tools to help with testing, implementation, security, and builds. I’m not a Java dev, but if you are, I guarantee there’s something useful for you in this talk.

    Unmesh Joshi presenting at YOW

    Unmesh Joshi is a principal architect at Thoughtworks and author of the book Patterns of Distributed Systems. Unmesh explained how knowing patterns makes you an expert, and helps you acknowledge essential complexity while avoiding accidental complexity. He walked us through some common problems of distributed systems, like mapping keys to nodes or ordering requests across replicas. Patterns serve as a guide to achieving “platform sympathy,” which means aligning with a system’s design to gain optimal performance.

    Josh Long presenting at YOW

    And last but not least is my friend Josh Long. Josh is a developer advocate for Spring, and he’s one of the most entertaining presenters I’ve ever seen. He started by introducing us to his dog Peanut, who he described as a “terror,” and then proceeded to build an entire demo around adopting dogs. He went 100mph and had everyone laughing and jotting notes as he raced from topic to topic, including event-sourcing and CQRS. He’s like a virtuoso of live coding, and if you ever get the chance to see him – regardless of whether you’re a programmer or not – I guarantee you’ll have a wonderful time and learn something from him.

    Me, Nilesh, and Steffen

    Thank you again to Steffen and the YOW! team for inviting me to be a part of the event this year, and to all the speakers and volunteers who helped make the conferences possible. These events are a ton of work, but they’re such a great opportunity for Aussie developers to come together, learn from some of the smartest folks in the world, and build important connections across our industry.

  • Git push from highway

    Git push from highway

    He’s already completed one Advent of Code challenge this month from the beach. Today he did one going 110kmph down the motorway. (I did miss our exit, but at least he got a pretty good score!)

  • Don’t be a creep, Mr. Feynman.

    After 10 days of tech conference, *of course* I was going to come home on Friday night and watch a 3hr documentary on why Richard Feynman’s legacy is mostly BS. Who wouldn’t?

    (via Metafilter)