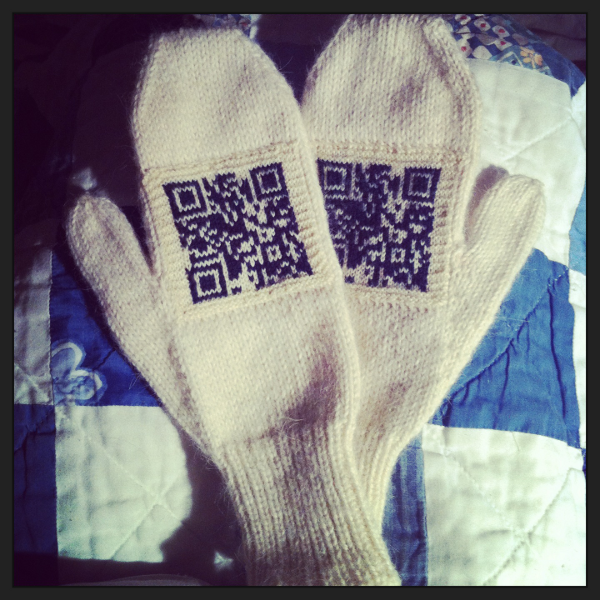
After giving a talk on geek knitting in 2012, I was inspired to try my hand at knitting a QR code. The code on these mittens actually scans and points the viewer to the pattern on this page so they can make their own. Hence, self-replicating mittens!
Edited on 16/03/2025: Google are killing the URL shortener in 2025, which means at some point the QR code – http://goo.gl/9XJgR – will stop working. Bastards.
These mittens are knitted in the round, so you’ll need to know how to use double pointed needles. Alternatively, you can always use the “Magic Loop” method of using one long circular needle, or – my personal favourite – using two circular needles.
Materials:
- 2mm straight needles
- 3mm needles – either DPNs or circular(s)
- 3.75mm needles – either DPNs or circular(s)
- 8ply/DK wool for the mittens (100g should be plenty with leftovers)
- 3-4ply baby wool in two colours for the QR code (just scraps)
- darning needle
- QR Code Chart (PDF)
Sizing: I made these to fit my own hands, which are normal adult women’s size. To adjust bigger or smaller, simply change the number of stitches you cast on and how many you increase for the thumb.
Tension: Come on, it’s a pair of mittens! You’ll notice that these are knitted with slightly smaller needles than you would normally knit 8ply/DK wool. That’s to make the fabric more dense and keep the air out.
Instructions
Using the 3mm needles, cast on 44 stitches in your 8ply/DK wool and join for knitting in the round.
Knit 28 rounds of K1P1 rib.
Switch to 3.75mm needles and knit 2 rounds plain (stocking stitch).
Now we’re ready for the thumb increases. Your thumbs are on opposite sides of your hands, so you need to knit each one differently!
R mitten:
Increase Round 1: K1, M1, K1, M1, knit to end
Increase Rounds 2-4: Knit plain
Increase Round 5: K1, M1, K3, M1, knit to end
Increase Rounds 6-8: Knit plain
Continue in this pattern, adding 2 more stitches between the M1s each time until you reach 58 stitches.
Knit 1 row plain.
Now we need to remove the thumb stitches and set them aside for later.
Next round: K1, slip next 15st onto scrap wool, cast on 3 stitches, continue to knit round.
Knit 25 rounds plain.
Time to start the decreases!
Decrease Round 1: *K1, SSK, knit 23st, K2tog, K1,* repeat for other side of mitten.
Decrease Round 2: Knit plain.
Repeat in this pattern until 22 stitches remain.
Use Kitchener stitch to graft closed and then weave in your ends!
L mitten:
Increase Round 1: K42, M1, K1, M1, K1
Increase Rounds 2-4: Knit plain.
Increase Round 5: K42, M1, K3, M1, K1
Increase Round 6-8: Knit plain
Continue in this pattern, adding 2 more stitches between the M1s each time until you reach 58 stitches.
Knit 1 row plain.
Again, it’s time to remove the thumb stitches and set them aside for later.
Next round: K42, slip next 15st onto scrap wool, cast on 3 stitches, K1
Knit 25 rounds plain.
Time to start the decreases!
Decrease Round 1: *K1, SSK, knit 23st, K2tog, K1,* repeat for other side of mitten.
Decrease Round 2: Knit plain.
Repeat in this pattern until 22 stitches remain.
Use Kitchener stitch to graft closed and then weave in your ends!
For each thumb:
Put 15st from scrap wool on needles.
Knit around all stitches, picking up and knitting 3st to close the gap at the top of the thumb.
Knit 16 rounds plain.
Decrease Round 1: *K1, K2tog* repeat around.
Decrease Round 2: Knit plain.
Decrease Round 3: *K2tog* repeat all the way around.
Break off wool and run end through remaining stitches, draw up tightly and fasten off.
QR Code (make 2 of these):
Note – the QR code is knitted back and forth using the fairisle/stranded knitting technique. Yeah, you have to use two colours on the purl side, but it’s a small pattern and you’ll survive. Wherever there is a float longer than 5 stitches, I recommend “catching” the floating wool with the working wool. However, since this is going to be sewn to the mitten, it’s not crucial and you don’t have to do it. Just make sure your floats are loose enough not to draw in the design too much!
Using the 2mm needles and your baby wool, cast on 33 stitches.
Knit 4 rows of garter stitch.
Keeping a 4st border on each side in garter stitch, begin working the QR Code Chart in stocking stitch.
Once the chart is finished, knit 4 rows of garter stitch to complete the border.
Cast off and weave in your ends.
I recommend BLOCKING THE HECK out of your QR codes, otherwise they may not scan. I cut two pieces of paper exactly 3 inches square, then wetted my patches and pinned them out to this size. Once they are dry, simply sew them to the back of your mittens!


Self-Replicating Mittens by Kristine Howard is licensed under a Creative Commons Attribution 3.0 Unported License.