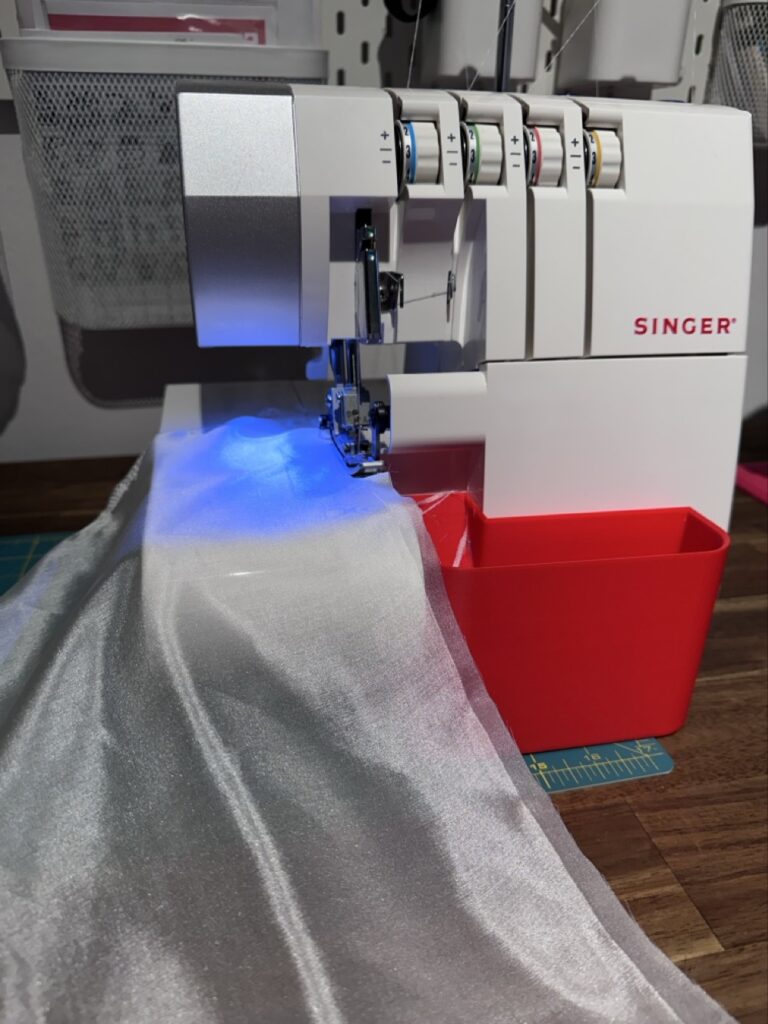
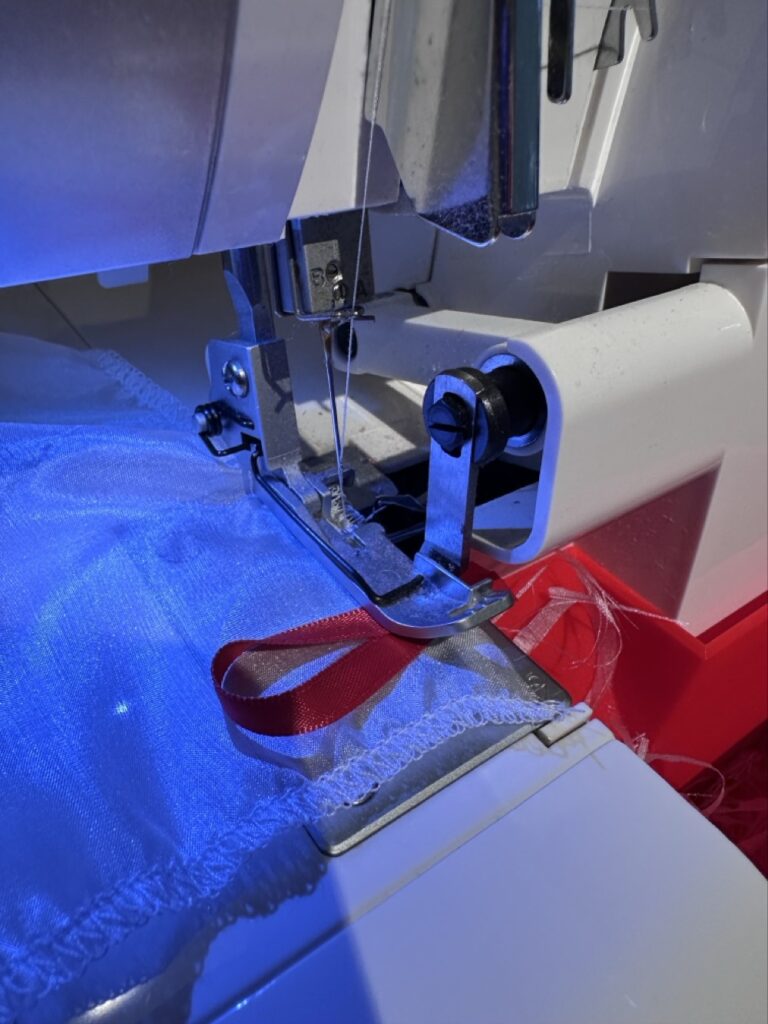
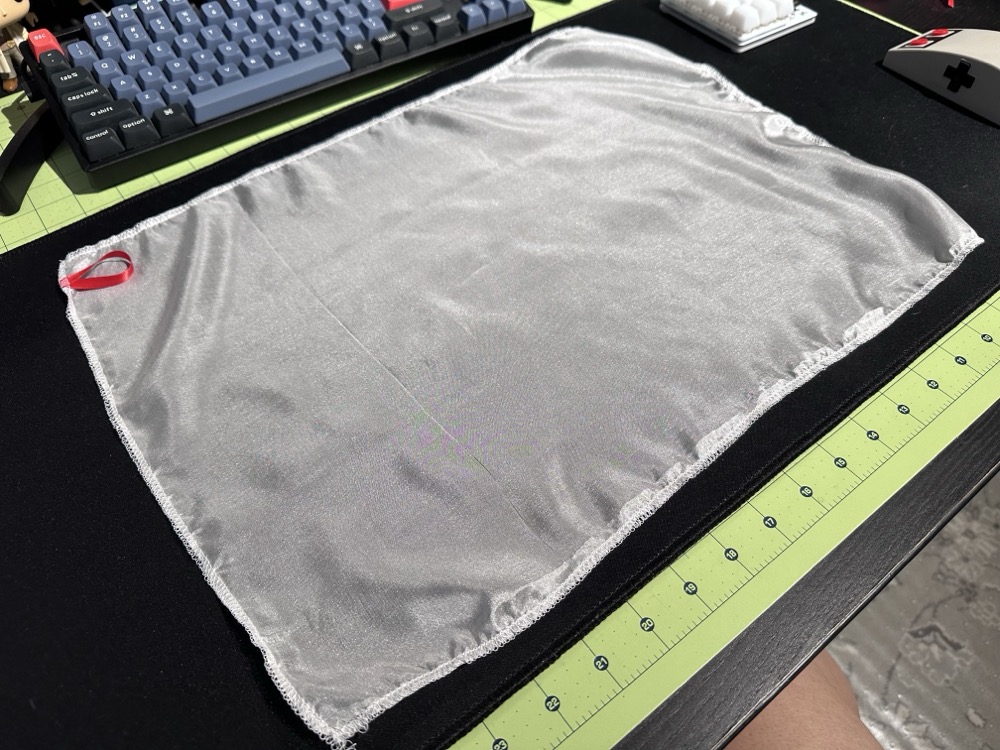
Category: Crafts (page 2 of 28)

Montrose Top

I think this is my fastest sewing project yet! This is the Montrose Top from Cashmerette, and I whipped this up in about 4 hours today.

The fabric is Liberty Saville Poplin in a lavender print that I bought at The Fabric Store during their last sale. (Savvy blog readers will notice that I used it for the Snook’s most recent Simon Shirt. I deliberately bought enough so I’d be able to make something simple for myself too!) The only real design feature on the garment is a curved and gathered back yoke, which was pretty simple to do.

In terms of sizing, the pattern offers 9 different sizes, 3 different cups, and 2 different sleeves, so it’s suitable for pretty much everybody! I cut a straight 20 C/D, and it’s comfortably roomy. (I might go down to an 18 next time.) This is definitely the best sleeve fit I’ve ever had on a garment I’ve made for me. I made one alteration to lengthen the front and back, just based on the fact that the pattern was written for someone who’s 5’6″. I’m closer to 5’10” but I’m also short-waisted, so I decided to add in 2″. However, when I tried it on it was still too long, so I ended up chopping that length off and rehemming. Next time I’ll go back to the original length.

I can see myself making these in lots of different colours. Just a great little wardrobe staple! I reckon I like it even better than the Colette Sorbetto…

Colette Iris Shorts

I realised today as I was wearing my fancy handmade Colette Iris denim shorts that I had intended to blog the whole process for you back in February. Whoops! Better late than never.

These were my fifth iteration of the shorts, and I’m extremely happy with how they turned out – especially since the 1st and 2nd versions weren’t even wearable! Over the course of refining the previous versions, I ended up adding some room to the butt, lowering the crotch, and then scooping out the front seam a little. I also added custom piping (which I blogged about here) to both edges of the waistband.

Here’s what I used to make these shorts:

You don’t actually need all of this stuff. For sewing supplies, all you really need is a good pair of scissors, some pins, a ruler, and something to mark your fabric. I have a fancy cutting mat and rotary cutter, and I sometimes use carbon paper to transfer markings. My sewing machine is an old (nearly 20 years, I think?) Janome that I’ve had serviced once or twice. It doesn’t have all the bells and whistles but it does the job. For this project, I used denim needles which are a bit stronger than normal ones (since denim is thicker to punch through). I also have a very basic Janome overlocker that I bought at Aldi a few years back, but that’s optional too. (You can just zig-zag your seams with your regular machine.) You’ll also need the pattern, of course, cut out in your chosen size. For fabric, I used 100% cotton denim I bought at The Fabric Store as well as some leftover Liberty Clarks Canvas for the pockets and piping. You also need some iron-on interfacing.

Let’s get started! I began by laying out my front and back pattern pieces on my pre-washed fabric.

I used my clear ruler to make sure the grain lines on the pattern pieces were parallel to the fabric edge.

I used my rotary cutter to cut out the pieces, but you can also use scissors if you prefer. (You’ll probably want some sort of pattern weights to keep your pieces from moving around. I don’t have special ones; I just use my rulers and whatever desk supplies are lying around.)

Next I transferred the markings from the pieces. For notches, I just made tiny snips into the edge of the fabric.

For darts, I used my carbon paper and tracing wheel to transfer them. I folded the paper in half (right side out) and slipped it between the layers, which means I could transfer to both pieces at once.

For marked dots (like for pocket placement), I poked a hole in the pattern and then used a special marker for marking on dark fabrics. It leaves a white dot that’s very visible! You can also use chalk for this.

Just to show you a more lo-fi method of cutting out pieces, for the waistband I traced the pieces using chalk and cut them out with scissors. These are cut “on the fold” so each pattern piece is only half the size of the resulting fabric piece. (To maximise fabric usage, I flipped the front waistband pieces over so they nested better and resulted in less waste.)

I also cut all of my pockets out of my lining fabric.

The last bit of cutting was to cut the waistband pieces out of iron-on interfacing.

And it was finally time to start sewing! The first task is staystitching, which I hate because it’s boring. I had to sew lines of stitching along the top and bottom edges of all four waistband pieces to stabilise them and keep them from stretching. I also had to staystitch at the waist edge of the shorts pieces.

Next I had to iron on the interfacing to two of the waistband pieces. (I used a damp tea towel as a pressing cloth for this.)

Next it was time to sew the darts! I put a pin at the point of the dart and then folded them to bring the legs together. I sewed from the top to the tip, shortening my stitch length as I got closer to the tip. (I normally sew at 2.5 length; by the time I get to the tip I’m as short as my machine will go.) Then I knotted the tails and trimmed them off. I ironed the darts towards the center.

The next task was to finish the edges of the pockets, which I did with my overlocker. (You could also zigzag these with a sewing machine.)

Next, I lined up the pockets with the marked dots on the side of each piece and pinned them in place. I sewed them down (with a smaller seam allowance than normal), then finished this entire edge with my overlocker. Then I ironed the pockets so they flipped away from the piece.

The next job was to sew the front pieces together to finish the pocket openings. I lined up the pieces and pinned them together. I sewed from the waistband down to the leg (with a normal 5/8″ seam allowance), pivoting 90 degrees to sew around the pocket pieces as I went. Then I ironed the seam, pressing the pockets towards the center. You can just see the pocket fabric peeking out!

Time to sew the crotch! I joined up each front piece with its corresponding back piece and pinned the short inside leg seam. I sewed the seam, then overlocked each side of the seam allowance separately so I could iron it open.

Next, I lined up the two halves of the shorts and pinned the crotch seam from front waist to back waist. After sewing this seam, I cut into the seam allowance along the curved bits to allow it open up. Then I overlocked each side of the seam allowance separately and pressed it open.

It was finally starting to look like a pair of shorts!

I turned them inside out and pinned the right side seam together. (The left side is left open since it will have the zipper in it.) Then I sewed the seam, overlocked the edges, and pressed it open.

Before I could insert the zipper, I had to attach the waistband. I sewed the interfaced bands together at the right side. Because the non-interfaced waistband is on the inside, I had to sew the left side for that one. (Takes you a while to get your brain around the geometry, I know.) I finished the edges and pressed them open.

Here’s the point where I deviated from the pattern to add my piping! I pinned it to the top and bottom of the interfaced waistband piece, making sure to place it 5/8″ from the edge so it would just poke out from my eventual seams. I sewed it down using a zipper foot (which only has one prong and allowed me to sew very close up to the edge of the piping).

Next, I pinned the interfaced waistband piece to the top of the shorts and sewed it down. Again, I used my zipper foot so I could get close up to the piping (which was sandwiched in between the pieces). Then I ironed the seam towards the waistband.

It was time to install the zipper. Rather than walk through all the steps, I’ll just direct you to Colette’s excellent tutorial. I refer to it every time I have to insert one! Pro tip: It helps a lot to have an invisible zipper foot, which has special channels that your zipper teeth travel through. It allows you to get very close to the zipper!

Once the zipper was in, I pinned the remainder of the left side seam. Then I sewed it, making sure to overlap a bit past the point where the zipper ended. This is where I made my one mistake of the project: I should have overlocked these edges before putting in the zipper! I managed to do it after the fact, but it was a little messier than it could have been. Then I pressed the seam open.

Attaching the waistband facing is really counterintuitive and weird, so you just have to follow the pattern instructions and trust that it will turn out! I started by turning up the bottom edge 5/8″ and pressing it in place. Then I opened the zipper and flipped out the seam allowances. I aligned the waistband facing to these edges and sewed them down as close to the zipper teeth as I could get.

Then Colette has you do something really weird: you turn the zipper away from the opening again. Then I stitched down all along the top of the waistband, sewing slowly over the zipper and using my zipper foot to get as close to the piping as I could. Then I trimmed down the seam allowance at the corner and graded it down all along the seam. Then I flipped the facing away from the seam and understitched it as far as  I could (meaning I sewed the seam allowance to the facing along the edge of the piping – it’s supposed to make sure the waistband rolls to the inside).

The final waistband steps were to turn out the waistband completely and poke out the corners, give it a good press, then hand baste down the folded facing edge on the inside. Then I edge stitched on the outside of the garment along the piping to make sure the facing was caught and sewn down securely.

And the final, FINAL step was to hem the legs of the shorts. I folded them up twice and pressed, then sewed down the hem. And they were finished!

I hope that gives you an idea of the amount of work that goes into a single garment. I think there’s a perception that sewing your own clothes saves money. It really, really doesn’t. Think of it this way: all up, these took me about 7 hrs over the course of two days. (That includes an hour to make my own bias binding and piping though.) At current Australian minimum wage of $18.29, that means there’s well over $100 worth of my labour in these. The cost of materials would push that even higher.

Now think about how much you might pay for a pair of denim shorts in a shop. I’m guessing it’s a lot less! (And no, it’s not solely due to automation. Sewing clothes is still a largely manual process, as robots can’t yet handle textiles very well.) Someone got paid to make your clothes, and they probably got very little for it and worked in very crappy conditions. No, I haven’t stopped buying clothes in shops yet. But making my own things makes me more appreciative of the work that goes into it, and less willing to shop at the “fast and disposable” fashion places these days.

Plus they look really cute! 🙂

Summer of Shorts!

I realised back in December that my wardrobe was pretty light on shorts and set out to rectify that. I ended up making FIVE different pairs from two different patterns, and I’m pretty happy with how they turned out!

These three pairs are all based on Colette Patterns Iris Shorts. They’re sort of retro, with pockets set into a front seam rather than on the hips. They open with a zipper on the left side. I bought this pattern years ago and made a first attempt at them, but they didn’t fit at all and I was too disheartened to try again. This time I was determined to crack it.

This was my first attempt. I didn’t want to use anything too fancy until I had fixed the fit issues so I used this blue floral quilting cotton I had in my stash. My first attempt was again a complete disaster, so I ended up pulling them apart and recutting the bum pieces to add more width to accommodate my hips. That seemed to do the trick! Wearable, but not perfect.

For my second attempt, I made further adjustments. The blue pair felt like they were, uh, riding a bit high, so I lowered the crotch by half an inch on both the front and back pieces. (The first adjustment detailed on this page.) For this pair, I used a pink fine-wale corduroy I bought from Jody‘s Mum’s destash. I didn’t have much of it, which turned out to be problematic when I screwed up the cutting and had to recut one of the front panels. There’s definitely some bodgy bits around the pockets on these, but overall the adjustment was a success. The fit is relaxed and comfortable!

The last pair were just finished today. These are made from a beautiful denim that I picked up during The Fabric Store‘s recent sale. I made one final adjustment to the fit, to “scoop out” a little more of the front crotch and remove a little excess fabric there. I decided to get a bit fancy with these and apply piping to the top and bottom of the waistband. I used some beautiful Liberty cotton canvas for the piping and the pockets, and I’m so happy how they turned out! (I also documented the whole process of making them, which I’ll be posting soon.)

The other two pairs of shorts I made were from the Prefontaine Shorts pattern by thatmoxiegirl. I ❤ this pattern!

This pattern is a roomy cut and features very inclusive sizing, so I didn’t have to make a single change. These were the first pair I made, which used some quilting cotton I’ve been holding on to for years, waiting for just the right project. I’m slightly annoyed that I wasn’t smart enough to vary the placement across the fronts to avoid the obvious repetition across the crotch seam, but it’s fine. The waist is elastic so you don’t have to bother with putting in a zipper. The black trim along the edges is actually recycled from an old t-shirt! That’s a trick that the pattern suggests, and it’s brilliant. Since it’s a knit it goes around the curves easily without needing special bias tape, and it feels great against your skin.

My second pair turned out so, so well. As soon as I saw this Liberty Meandering Chrysanthemums cotton canvas at The Fabric Store’s sale, I fell in love and immediately knew it was destined for these shorts. The dusty pink trim is again from an old t-shirt.

For this pair, I also added welt pockets on the back. They’re a perfect size for my cell phone!

I cannot tell you how satisfying it is to make your own clothes! It’s getting to the point now where Rodd and I will both be wearing garments that I’ve made, out in public or to work or whatever, and nobody knows that there’s actually no label inside. Hm. Maybe I should get my own labels, huh?

The “Knitted” Laurel Dress

As you may have picked up on yesterday, I made yet another Colette Laurel dress for Frocktober! I used the same mods as the Big Data dress: sleeveless, notched neckline, and pockets. On this one, I moved the pockets outwards slightly as they felt too close together. I also cut the back in one piece rather than having a waist seam.

The fabric is called Breeze by Rosemarie Lavin for Windham Fabrics. It’s actually a quilting cotton that I picked up at Morris & Sons earlier in the year. I bought it on a lark, mostly because it’s printed to look like knitting! I thought I’d make a simple blouse out of it, so I only bought 2m of fabric. Unfortunately that was barely enough to make this dress, so I’ll have to wear shorts under it for modesty. Still – cute dress for a hot day!

The Big Data Dress

I made a new dress last weekend! This is a sleeveless Colette Laurel that I modified to have pockets(!) and a notched neckline (using this free hack). I’ve made a few sleeveless Laurels before, and the main attractions (besides looking nice) are that they’re fast to make and don’t use very much fabric. I had about 2.5m of this fabric, but it’s a quilting cotton and thus very narrow (less than 45″ wide). It’s navy blue and covered with a stream of binary numbers in light blue and silver. (So cute!) It’s called “Binary Solo” from RJR Fabrics’ collection “Silver Circuits.” My Mom made a point of showing it to me at her shop back in Indiana, and I just had to have it!

I’m calling it my “Big Data Dress” because, as Juliet Houghland pointed out at YOW! Data recently, all stock images of “Big Data” are blue and involve binary. 😂 I wore it to Girl Geeks last night and it was a big hit!

Sewing notes: Based on my measurements, I cut a straight 18 (the largest size) on this pattern. It’s roomy, but given the style of the dress and the crispness of the cotton, that’s what I was aiming for. It’s very comfortable. There are bust darts on the front and diamond-shaped darts on the back that keep it from being a completely shapeless sack. The hack instructions were easy to follow, but I didn’t bother tracing the pieces onto new paper. I bought the pattern PDF, so I can just print another one, right? So I just cut the front and back in two and then taped on some extra for the seam allowance. I had been worried about getting the print to line up across that center front seam, but then I hit upon the obvious solution. Cut it on the fold as one piece, and then split it up the middle. Voila! Lines up nicely. I finished the neckline and armhole edges using bias tape that I made – as always – using Colette’s continuous method. (For reference, I used a 9″ x 9″ square and just managed to eke out all three openings.)

What I’d do differently next time: I’m not sure why the back piece needs the corresponding horizontal seam. Maybe it’s because Sarai made hers out of linen, so it’s more visible and looks weird if it’s not there? But my print is so busy that I could have easily left it out and saved myself some cutting and sewing time. I’d also move the pockets out a little bit further as the 2.5″ from center she suggests seems a bit close for me. Lastly, I’d probably consider putting some interfacing behind the neck notch. (I still might do that, actually.) I noticed when I was wearing it yesterday that one side wanted to flop forward and fold down occasionally, so a little bit of extra stiffness there couldn’t hurt.

Overall I’m very, very happy with this one! It’s cute, comfortable to wear, and a real conversation starter.

East Neuk Hoodie

This may well be my favourite thing I’ve ever knitted myself.


The pattern is East Neuk Hoodie by Kristen Orme.  The yarn is KnitPicks Comfy Worsted in Fairytale, and I used about 20 balls. It has a hood, a placket neck with three buttons, a pocket, and (randomly) elbow patches. It’s soft and comfy and well-made, and the colour is beautiful. I ❤️ it!

This was such a fun knit, despite the fact that my tension was way off when I started so I had to frog the whole thing and start over. Once I settled on the right size and needles (4mm), it was smooth sailing. My row gauge was still off, but that’s easy to compensate for as you go. (I did have to do some maths to make sure the sleeve cap came out the right size.) Overall it’s slightly large, but I wanted this to have the ease of a sweatshirt so I’m happy with it.

My one worry is that the yarn is going to pill. It shed a LOT while knitting (my couch is covered in pink fluff), and the comments on the KnitPicks site indicate that others have been disappointed with its tendency to pill. So I’m steeling myself for it now, knowing that I’m going to have to give this the occasional shave. I still love it though.

Ravelry details are here!

Sewing notes: Georgie Tops

It’s time to get serious about my sewing, so I’ve made a resolution this year to not buy any new clothes (excluding undergarments, which are in the Too Hard basket for now). Towards that end, I’ve sewn two more new shirts so far in 2017 from Tessuti’s Georgie Top pattern.

Georgie #1: The first was this short-sleeved version in a vintage fabric remnant I had. (We did a burn test on it and it melts so I reckon it’s probably either nylon or polyester.) I cut the largest size and did an FBA – more on that in a sec – and finished with exposed bindings. For the bindings, since I had limited fabric I didn’t bother cutting them with the provided pattern pieces but instead used a square to make continuous binding via the Colette method. I really like the Tessuti method for doing the back neck keyhole opening. I don’t get their insistence on using tearaway Vilene to stabilise the neck though – it seems like stay-stitching would work just as well? Overall I’m really happy with the finish on this one. All this practice is really paying off! The only outright mistake I made on this project was cutting the sleeves upside-down, so the motif (which looks a little like an insect!) goes the wrong direction. It’s small enough though that (the Snook claims) you only notice when I point it out. 🙂

Okay, so the FBA. Based on my experience with other Tessuti patterns, I decided to do a Full Bust Adjustment on this one before I started. The problem is that I trusted the first result that Google gave me: this Craftsy tutorial. People, this tutorial is WRONG! But I didn’t realise it at the time. So I followed the instructions, not realising that step 7 had a massive error. Then when I went to sew up the side seams, guess what? The front was massively longer than the back. Which makes sense, as that stupid tutorial has you draw the new dart in such a way that you’re adding material to the side. I ended up having to rejig my bodice front on-the-fly and try to make it work, and I still ended up having to cut material off the bottom. So though I’m pleased with the finish on this one, I feel like the fit is slightly weird. The neckline is a little high for me (not really the fault of the FBA though), and there’s excess material on my upper chest. It’s wearable, but not exactly great.

Georgie #2: The second Georgie is this sleeveless version in a vintage cotton remnant. (It’s got little medals all over it!) I was inspired by Gertie’s keyhole blouse to try for a keyhole neckline detail on the front. The first thing I did was print a new bodice front, lower the neckline, and then do a proper FBA. Then I free-handed a U-shape at the center of the bodice front piece and cut it out of my fabric. Rather than using Vilene, I simply stay-stitched the neckline, keyhole, and sleeve openings before I started. I again made my own continuous bias tape via the Colette method. Binding the keyhole was tricky but doable, and I’m really pleased with how flat it turned out! When I bound the neckline, I initially left a gap of about an inch across the keyhole (so it was more of a U-shape than a teardrop). Then I tried it on, and I again had the problem of excess fabric in the upper chest. When I pinched the top of the U-together though (simulating a tuck), it magically disappeared. Huh! So I unpicked half the neckline binding and then redid it, joining the top of the U together into the teardrop. Very happy with that outcome! (If I make this again without a keyhole, I’ll adjust the bodice front to remove that wedge.) As for the sleeves, I did actually cut them and I intended to use them, but when I tried it on for my neckline alterations, I realised I liked it better sleeveless. I debated whether I needed to adjust the sleeve openings – I know that sleeveless garments tend to have larger armholes – but they looked fine. So I simply added an exposed bias binding to each armhole. So far I’m really happy with it!

Lady Skater Dresses

Lady SkatersFinally blogging these two Lady Skater dresses that I made at the start of Frocktober. This pattern’s been on my wish list for a long time. It’s pretty fast to sew up, especially if you have an overlocker. I made the pink one first, and I used a fine merino jersey that I bought at Tessuti’s on clearance a few years back. It has a subtle texture through it, I think created by elastane that has been woven in narrow stripes. It was a pain to work with though, because it was nowhere near square and it curled like crazy. Still, I made that first one in about a day. I could tell while I was sewing it that the waist was going to be too low, but I shrugged, told myself it was a wearable muslin, and kept going. (The fabric had been really cheap as it had a hole at the end that I had to cut around.) The end result doesn’t look too bad in the photo, but it’s practically a drop-waist on me. That waist seam is supposed to be at my natural waist (ie the skinniest point), which is a fair bit higher.

So for the black one, I shortened the bodice by about two inches. (You can see the difference in the photograph.) Better, but I still reckon I could go a bit higher next time. The fabric I used is really, really weird. I bought it at a remnant sale a long time ago, and I have no idea what it is. It feels quite heavy, almost like a rayon, with elastic shot through it. I feel like you easily could use it for leggings or even a bathing suit! But I made a dress out if it, because WHY NOT. It’s actually pretty comfortable to wear.

The pattern itself is clear and easy to follow. I did have a hell of a time with the clear elastic though. It sticks onto my machine and refuses to feed through, so I came up with the idea of putting some wax paper over it. That helped, but it was still annoying and fiddly. Applying the neck and sleeve bands wasn’t too hard, but I haven’t quite mastered getting the joins to line up nicely with the seams. I still find the overlocker very satisfying though! I just need to remember the Cardinal Rule – when it starts misbehaving, check that it hasn’t been threaded wrong. (Every damn time…)

How to: Cotton Candy / Fairy Floss Costume

Cotton Candy CostumeYesterday was Canva’s third birthday, and the plan was to have a “Carnival” themed party to celebrate. As you all know, the Snook and I don’t mess around when it comes to costumes. We wanted to do something original and fun. (No “sexy ringmaster” for us, thank you!) I searched Pinterest for ideas, and I even looked through a gallery of freak show performers.

Me: I had a hilarious image of you as a bearded lady
but that might be offensive
The Snook: well, I’m offended 😛

In the end we decided to play it a bit safer. The original plan was to be sideshow performers – either plate spinners or bottle balancers – until I stumbled across this: DIY Cotton Candy Costume. We both laughed at the idea and decided to go for it. I documented the entire process and figured I’d share it here.

Read more →

Shrödinger’s Christmas Cat

For the Canva 2015 Kris Kringle gift exchange, I got a colleague who is mathematician and engineer. I tried stalking him on social media, but he doesn’t post very much. I knew that he’s into dark European films and quantum physics, so my genius idea was to knit him Shrödinger’s Cat!

You can find more details about the knitted cat over on Ravelry. Obviously, he’s alive on one side and dead on the other! To complete the experiment, I included a bottle of “poison” (ie vodka) and a container full of “radioactive material” (ie Kinder eggs). I packed it all into a cardboard box that I spraypainted silver (since it’s supposed to be steel) and decorated with “PROPERTY OF E. SHRÖDINGER” and “CAUTION: LIVE(?) ANIMALS” labels.

I’m very happy to report that the recipient was delighted with it. 🙂