A happy belated FIFTEENTH(!) blog-birthday to Matt at Scrubbles! His blog is one that I’ve read, well, pretty much ever day for a decade and a half now. I’ve got Mama Cat on my bookshelf and several LitKids prints on my wall. After years of only knowing him through his blog, it was great to finally meet Matt (and Christopher!) when we drove through Phoenix in April of last year.
You may not know, but Matt actually created the web-goddess logo for me (a barter deal for a custom knitted scarf). His anniversary reminded me that my own milestone must be coming up soon. The oldest post at this site is actually from September 7, 2000, but it was originally from a separate blog that I started for alumnae of my college dorm. The first personal blog post I wrote was on January 7, 2001, which was hosted at web-goddess.co.uk since I was still living in London then. (Wow. Some Internet marketroid has got the domain now. At least it isn’t porn, I guess.) And hey, my first first mention of Scrubbles was on January 31, 2001…
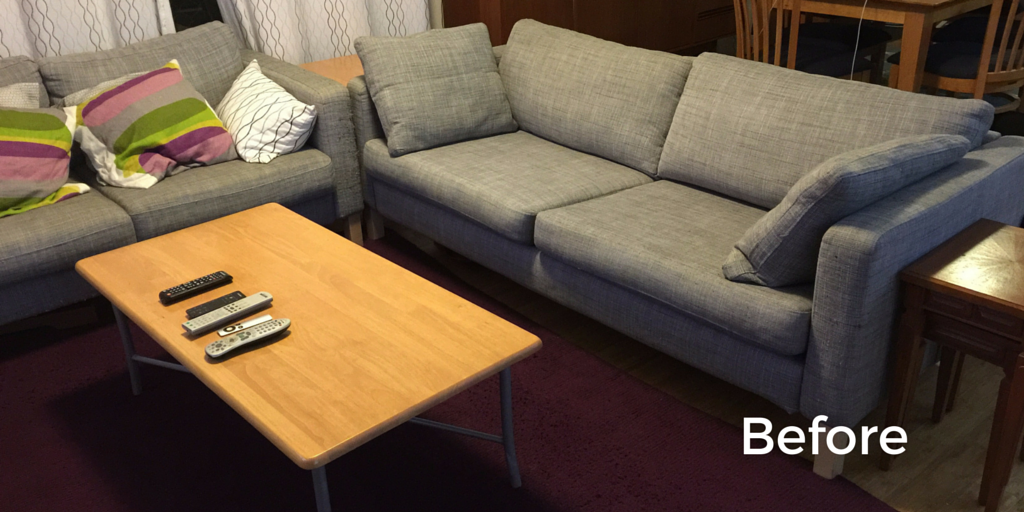
We’ve only ever had IKEA couches. Originally it was because we were still essentially students, unable to afford anything better. Then it was because we got cats who – despite every effort to dissuade them – love to shred furniture. I’ve had people tell me with straight faces that they spent thousands of dollars on their sofas, and I just shake my head and think Whaaaaat?!
A few years ago we got a two-seater Karlstad in Isunda Gray, which was fine except it wasn’t quite long enough for yours truly to sleep on. One day the Snook told me a colleague was selling a three-seater version in the same colour. We ended up buying it, intending on selling the old one… but somehow it just stayed. We arranged them like a pseudo-sectional, though we rarely sat on the small one. I was never quite happy with them though. This year I discovered two things: 1) it’s pretty easy to hack a Karlstad to look like a mid-century sofa; and 2) I really, really love my sister’s sofa with chaise. So I talked the Snook into selling the three-seater and getting a chaise unit for the two-seater, along with custom legs and a new cover.
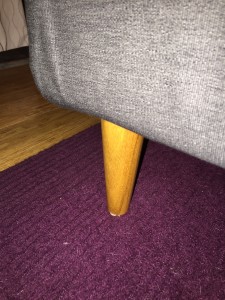
I bought my custom tapered legs from Uncle Bob’s Workshop. (Note: We decided to only get 7 legs rather than 8. When you add the chaise unit to Karlstad, theoretically you end up with two legs RIGHT NEXT to each other in one corner, and we decided that was stupid. We reckoned rightly that you didn’t need the extra one on the chaise.) They arrived and they were beautiful. Then I ordered a range of fabric samples from Comfort Works, and we decided that the Herringbone Bark was our preferred choice. However, rather than rush to IKEA to buy a new chaise unit, I decided to wait and see if they went on sale (or someone was selling one on Gumtree). After all, we weren’t in any rush.
Then last weekend I asked the Snook to list the old three-seater on Gumtree. He went to the IKEA site to look up the current asking price. “Dude,” he said, in that tone that means Something Is Up. “It’s not on the site. I think it’s been discontinued.” WHAT?! Yes, the Karlstad has been discontinued entirely. D’OH! Suddenly the whole plan was at risk. I started messaging everyone selling a Karlstad + chaise on Gumtree, but they were all taken. Things looked dicey.
THEN! The Snook discovered someone selling a Karlstad + chaise who’d messed up and not put it in the Home & Garden category. I messaged her and to my delight it was still available. Coincidentally, someone messaged me at the same time wanting to buy both of our old couches. So it was going to work out! The only hitch was that we had to collect the new couch on Wednesday, but the old couches weren’t being picked up until Sunday. So we had several days with three sofas in our living room.
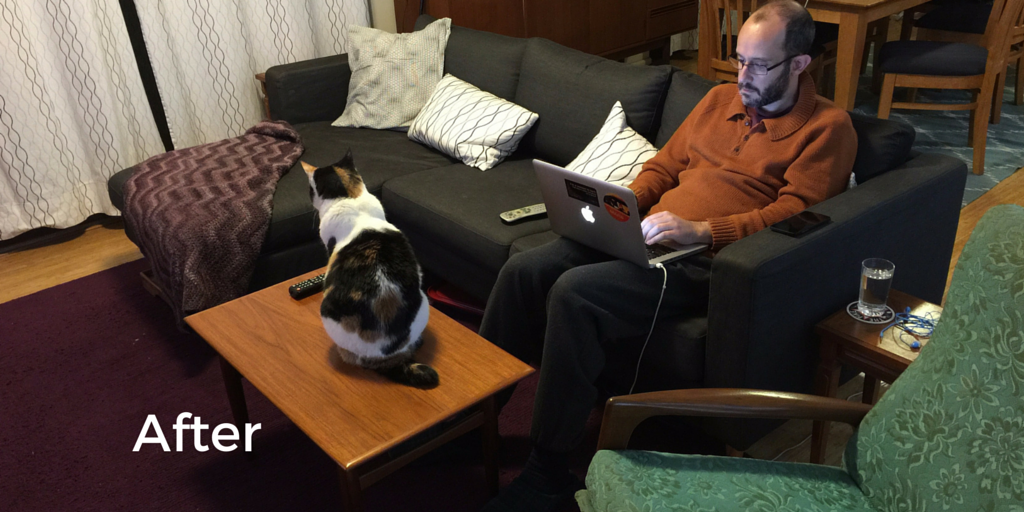
Anyway, here’s the end result.
New Karlstad with chaise, Parker coffee table, and Fler rocking chair
The new couch came with a reasonably decent dark grey cover, but I still think we’ll replace with the lighter grey one from Comfort Works. (The dark grey is covered in Amy cat’s hair already.) In front of it is our recently acquired vintage Parker coffee table, and that’s my Fler rocking chair on the side. And you can’t see it in that photo, but we swapped out those horrible legs for the beautiful tapered ones. So now at last things are starting to take shape! Just need to order the new cover and study up on how to tuft cushions…
Tapered mid-century legs from Uncle Bob’s workshop
Last week, I was going to upload some photos from the recent Girl Geeks event at Canva to my blog when I noticed a strange folder in my FTP directory called “PDFs.” Crap. Yep, my site had been hacked again. It was filled with PDFs for Viagra and all kinds of crap. (What the hell is even the point of that?!) This happened a few months ago and I worked with my host to lock it down, but obviously the exploit is still there. We’re not sure if it’s my code (which is pretty simple, really, mostly just writing and reading text from DB) or whether the shared server has been compromised. But it was just too much. I gave up, took the whole site down, and put up a holding page. I was through.
The next day I was having coffee with my friend John Allsopp, who asked me about it. (There were some rage tweets.) I told him I was mulling options. “Why don’t you use WordPress?” he said. What?! I’d never used WordPress before. For someone who’d written their own CMS, it seemed like cheating. And didn’t it get hacked all the time anyway? (Not that my CMS was doing much better.) He was like, “Look, I’m old school too but some stuff is just too much work.” So I started thinking about it, and then this weekend I took the plunge.
And here we are! I had a lot of fun figuring out how to import 13,000+ blog posts and 25,000+ comments. But I got there. The Snook helped me out with mod_rewrite so all my old post URLs should hopefully resolve to the new locations. Today I sorted out the theme, added some extra pages, and started categorising and tagging. (My CMS never had fancy things like that.) I got Instagram and Twitter auto-posts set up. I also moved over the sock monkey tutorial, as it was the most popular thing on the old site. I’ve still got heaps to do – all of my old photo pages are currently 404ing, for a start – but so far I like this. (Oh! And I’m on a new host too. I saw several people on MetaFilter recommending A Small Orange, so I figured I might as well make a clean break. RDF will remain on the old site until I can port it over.)
Comments are back on (for the time being). Any WordPress old-timers have any advice for me? Especially around hardening this thing. I’ve already implemented several security measures, but feel free to hit me with recommendations if you’ve got ’em. I was this sucker LOCKED DOWN.
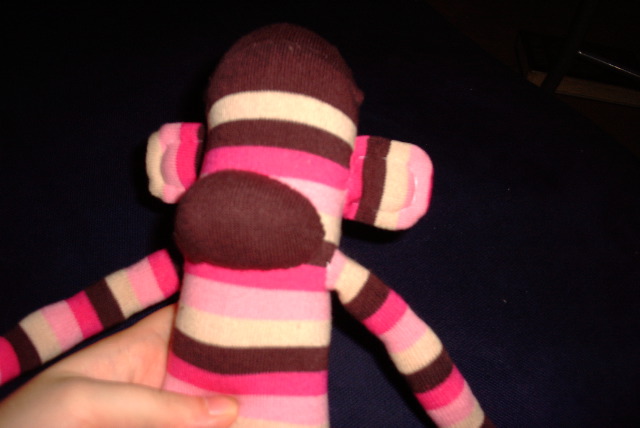
I published this tutorial back in 2004, and it’s been pretty popular! I’ve now ported it over to my new site. You’re welcome to link to it, but please don’t reproduce without my permission.
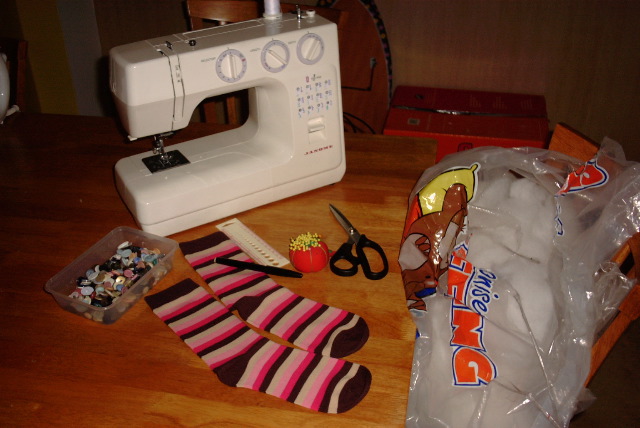
Everything you need to make a sock monkey: pair of socks, sewing machine, buttons (just two for the eyes), ruler (or straight edge of some kind), pen, scissors, stuffing, pins, needle, and thread. Ready to get started?
Before you start
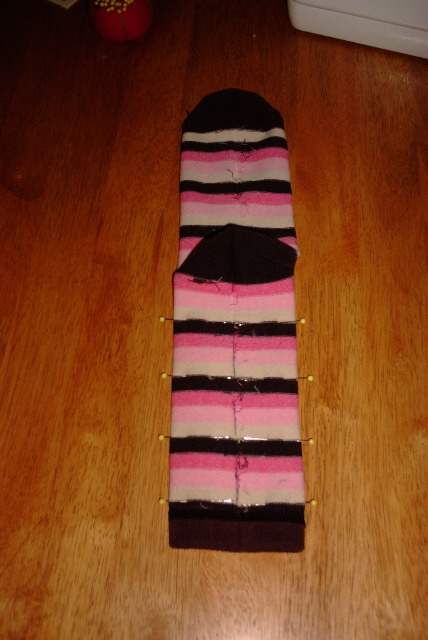
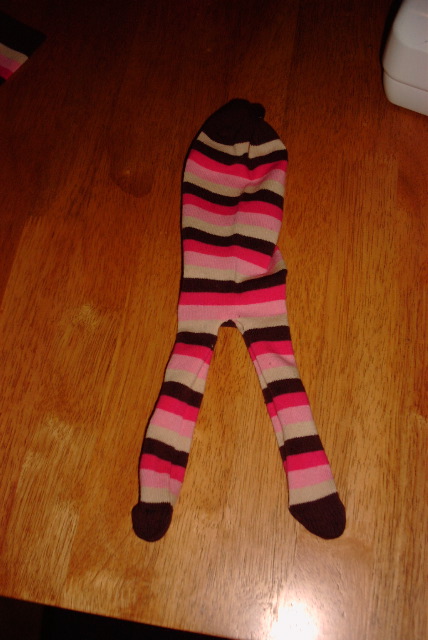
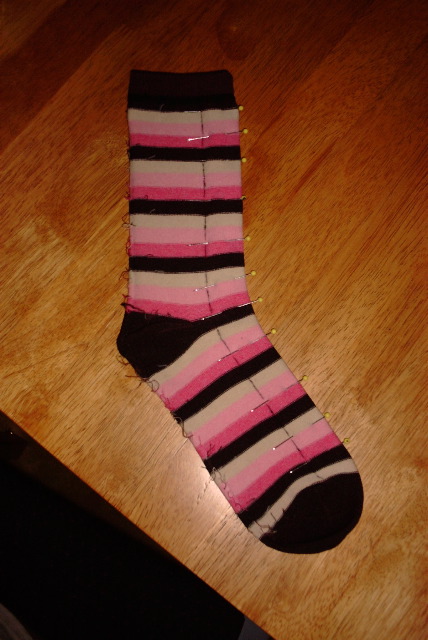
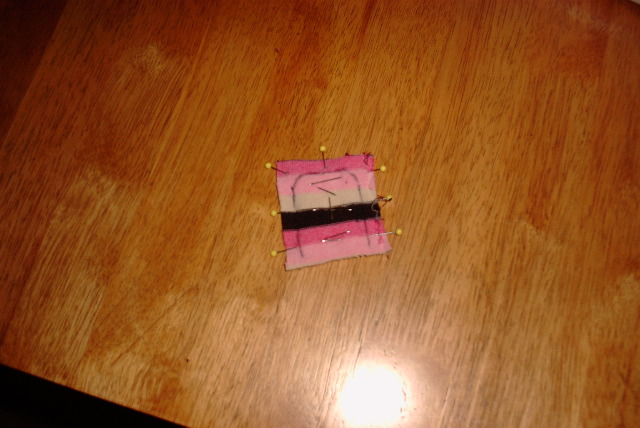
We start by making the body and legs of the monkey. First, turn one of the socks inside out and flatten it so that the heel is centered (as in the picture above). Use your pen and straight edge to draw a line down the center of the leg. You’re going to sew alongside this to create the monkey’s legs, starting about an inch or so from the heel (his bum). In my case, I’m going to start sewing at the first dark brown stripe below the heel. I’ve already put pins along the sides to hold the sock together. (This is particularly useful when you’ve got a design like stripes that’ll look bad if it doesn’t line up somewhat.)
Step 1 – Marking the legs
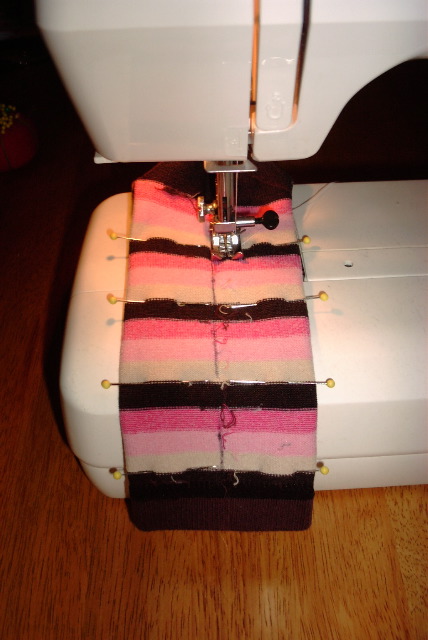
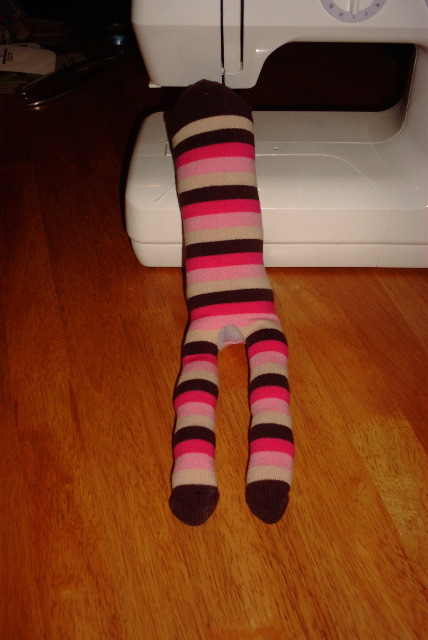
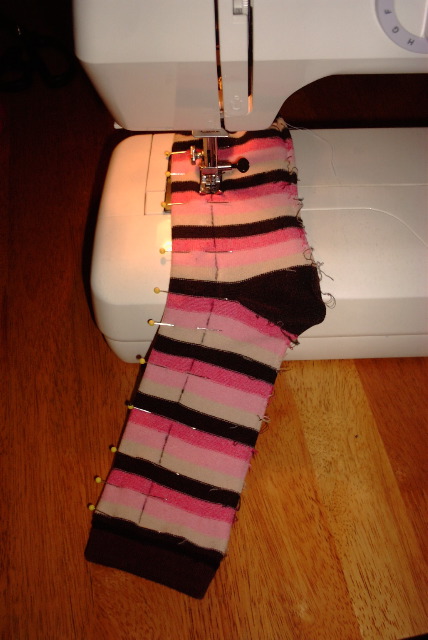
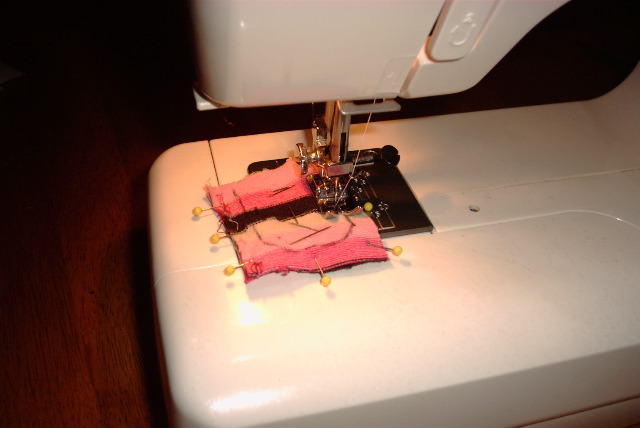
Here I’m beginning to sew the first leg. Note: You don’t sew on your pen line; you sew on either side of it (thus creating two legs). The width of your machine’s presser foot – about 1/4 inch – is just right. As I said, start at the top about an inch or so below the heel. Be sure to back up a little to secure your stitches. (For those in the know, you may want to use a ballpoint needle on your machine if you’ve got one. Otherwise, don’t worry about it.) Sew all the way down til you get to the sock’s cuff. Then stop every so often and turn the sock so you round off the foot. You can see this better on the next page. (And yes, I sew over my pins. I’m very naughty.)
Step 2 – Sewing the legs
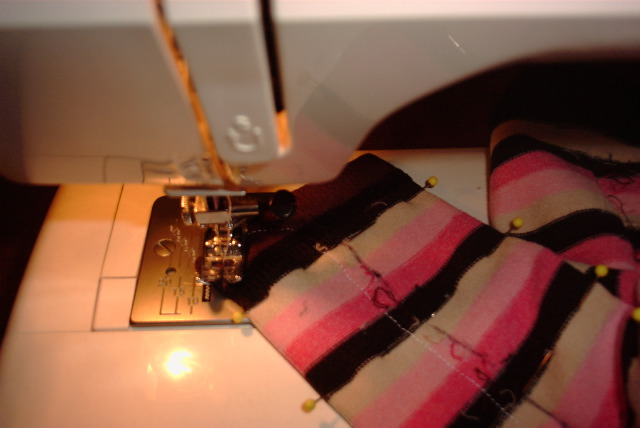
Here you can see my line of stitching down the sock and the way I’ve turned it to round off the foot. Don’t worry if you can’t get the curve perfect; mine turn out pretty angular actually. Once you’ve finished the foot, take a few backstitches to secure the seam and break the thread. Then go back to the heel and do the same thing again on the other side of your pen line. This next picture shows the end result pretty well.
Step 3 – Round off the foot
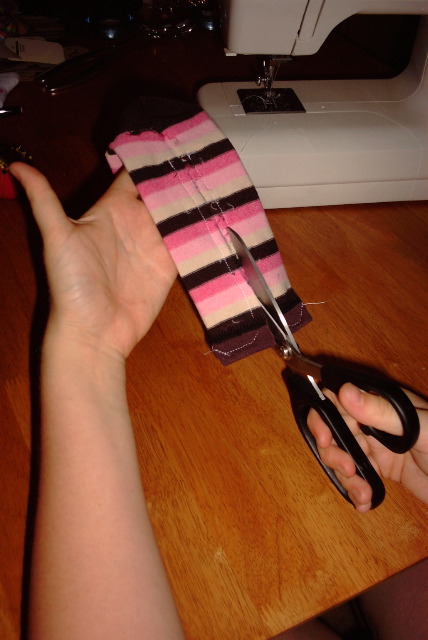
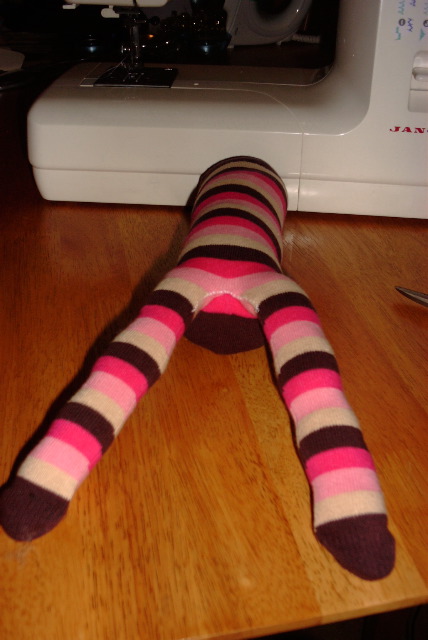
Here you can clearly see the seam lines delineating the legs, each ending in a rounded off foot. Now it’s time to separate them! Use your scissors and cut along your pen line up from the cuff towards the heel. Stop where you started sewing. You’ve now got an inside out monkey torso!
Step 4 – Separate the legs
Your inside-out monkey torso has a convenient hole in the crotch through which you can turn him rightside-out. Do this now. You can cut the hole a little bigger if you’re having trouble pulling him through, but try to keep it as small as possible. A chopstick or knitting needle can be helpful for pushing his legs out properly. Here he is, all ready to be stuffed!
Step 5 – Turn him inside out
And here he is in three dimensions! I’ve stuffed him with generic polyester stuffing I got at the craft store. (Note: I’ve tried stuffing monkeys with recycled quilt batting cut up into pieces, but they just come out too lumpy and weird-looking. I wouldn’t advise it.) Yes, you’re stuffing him through the crotch. I think pulling the stuffing into smaller pieces and pushing each one into place results in a nicer look than trying to wedge in big handfuls. Again, a chopstick is useful for pushing the stuffing down into skinny legs. Don’t be afraid to stuff him quite firmly. Nobody likes a floppy monkey!
Step 6 – Stuff the monkey
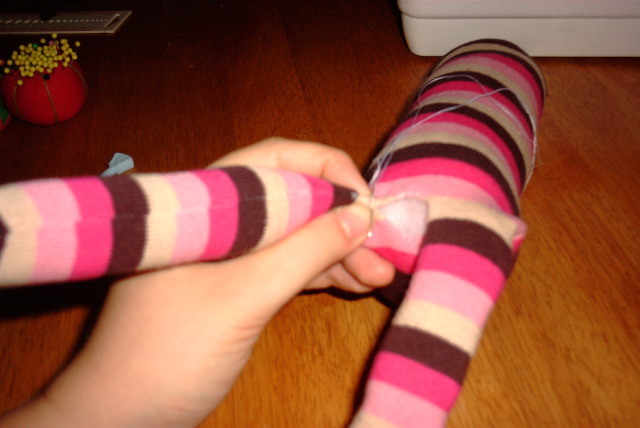
It’s finally time to sew up that monkey crotch. I just use plain white cotton thread and a sewing needle. Make a fairly large knot (otherwise it’ll pull through) and come up from the inside to secure it. You’re basically going to be pinching the raw edges together and tucking them to the inside. Then just take little stitches across the folded edges as best you can. It always gets a big difficult in the middle, when your sock inevitably stretches a little thin and you’ve got monkey legs flopping about, but just do your best. This really is a very forgiving project. I generally go all the way across the opening and then back again for extra strength. The next photo shows this process a little better.
Step 7 – Sew him up
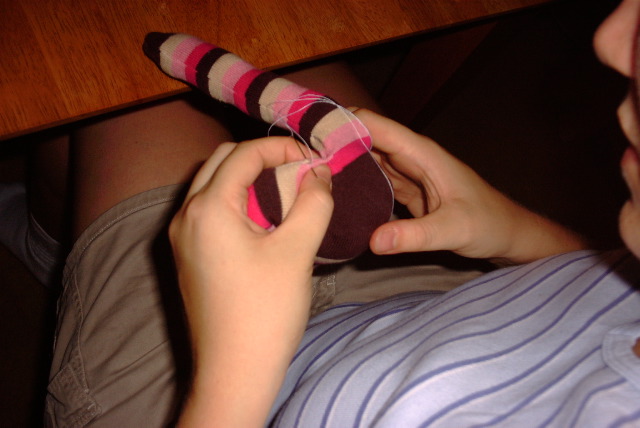
In this one I’ve got the monkey turned upside-down. You can clearly see that I’ve pinched the raw edges in together and I’m taking each stitch through both folded edges. It’s no use trying to use pins here; the monkey is too puffy and they’ll just get in your way. Try to keep your stitches small and tight and they won’t show so much on the finished toy. When I’m finished, I generally knot the thread two or three times close to the surface and then go back down the last hole and come out somewhere else. Gently pull the knot into the body, cut the thread, and let the tail disappear into the monkey.
Step 7 – Another view
Finished monkey crotch! You’ve now got a faceless sock monkey torso with no arms. Scary, I know. It’s time to make him some limbs…
Step 7 – Finished
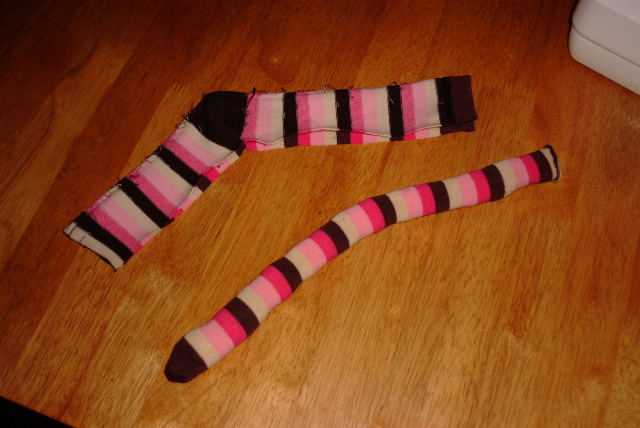
Now it’s time for the other sock. We’ll start by making the tail. Turn the sock inside-out and flatten it, but flatten this one in profile (as seen above). I’ve drawn a line from the toe to the cuff that’s one inch in from the edge. You can make the tail wider if you have a bigger sock as long as you don’t get too close to the heel. We’re eventually going to be cutting the heel out in one piece for the monkey’s face, so your tail width is limited by that. I’ve again secured the sock with pins to keep the stripes from shifting around too much.
Step 8 – Mark the tail
We sew the tail just like we did the legs. Start at the toe (but not in the toe itself; we’re just going to throw that away) and sew all the way down to the cuff, rounding off the end again. This time sew on the line.
Step 9 – Sew the tail
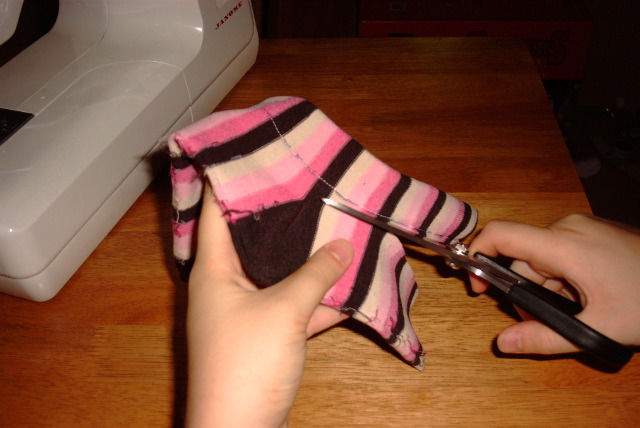
Cutting time! Start by cutting off the toe of the sock. You won’t need that anymore. Now we’re going to free the tail. Cut as shown along your sewn seam all the way to the cuff. (Again, I generally try to have a quarter-inch seam allowance, but you can get a little closer if you need to.)
Step 10 – Cut the tail
Turn your tail rightside-out and stuff it. You should end up with this lovely snakey thing and a random piece of sock. We come to that next…
Step 11 – Stuff the tail
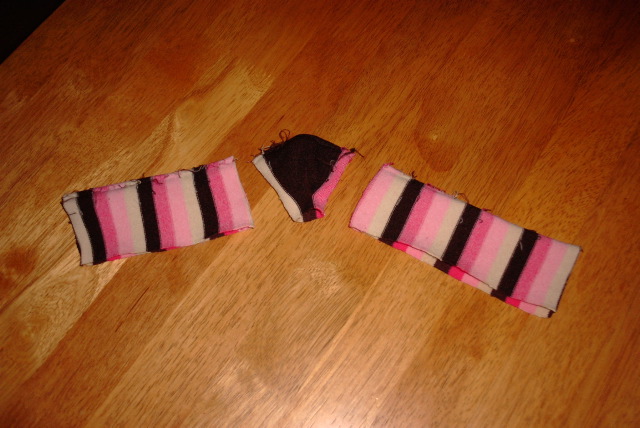
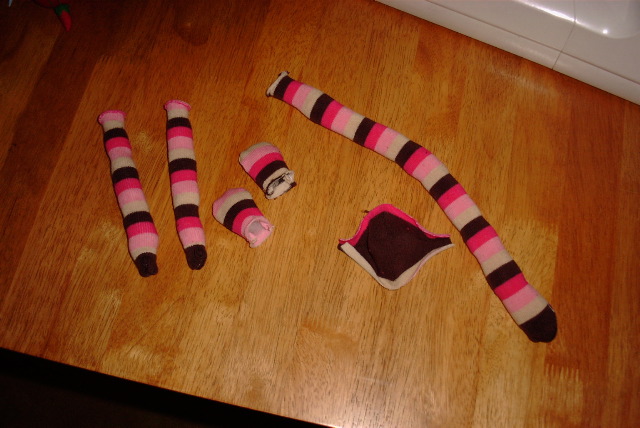
We’re going to cut the rest of the sock as shown into three pieces. The short rectangle on the left (from the foot part of the sock) will become the monkey’s ears. The heel in the middle becomes the monkey’s face. And the long rectangle on the right (from the leg of the sock) will become the monkey’s arms.
Step 12 – Cut remaining pieces
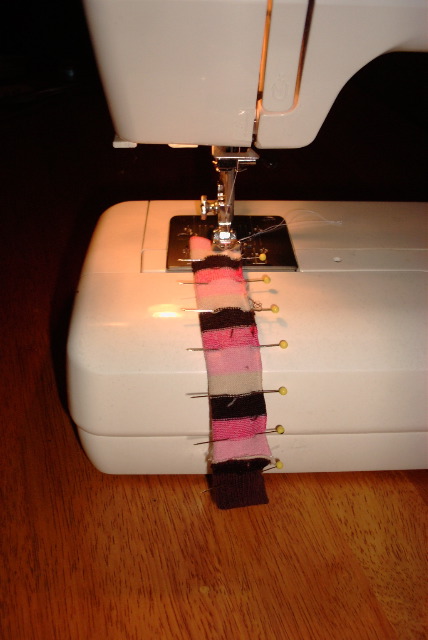
Start with the arm piece first. That’s the longer rectangle. We need to cut it up the middle length-wise to make two long skinny pieces. (Your sock already probably has a crease there.) Then fold one of these pieces in half, right sides together, and pin it along the raw edge. Then sew along this edge starting from the non-cuff end. (My seam allowance here is probably less than a quarter-inch, simply because I don’t want the arm to be any skinnier than necessary. Don’t get too close to the edge though or you’ll run into trouble. The raw edge has a tendency to curl and I often have to stop and readjust things below the presser foot.) Round off the cuff end for the hand just as you did the legs and tail. You’re basically just making yet another little tube. Once you’ve done one, make the other just the same.
Step 13 – Sew the arms
Now for the ears. Take your remaining bit of sock and cut it lengthwise as you did with the arms. Then cut each of those bits in half widthwise. We’re basically looking to get four little squares all the same size from this operation, as seen here.
Step 14 – Cut the ears
Take two of the matching squares and stack them with right-sides together. Then pin the heck out of them as shown. I don’t bother trying to make circular ears; these squarish ones look fine. Use your pen to draw on the ear shape. I generally just draw it with a quarter-inch seam allowance and round off the corners. (Once you’ve done a couple, you won’t even need to draw it.) As you can see, one side is left open. We’re now going to sew along the line.
Step 15 – Pin the ears
Here I am sewing along the ear line. Just go slowly and try to keep everything together as best you can. Once you’ve finished one, make the other just the same. You can trim off some of the excess seam allowance (like the square corners) when you’re finished.
Step 16 – Sew the ears
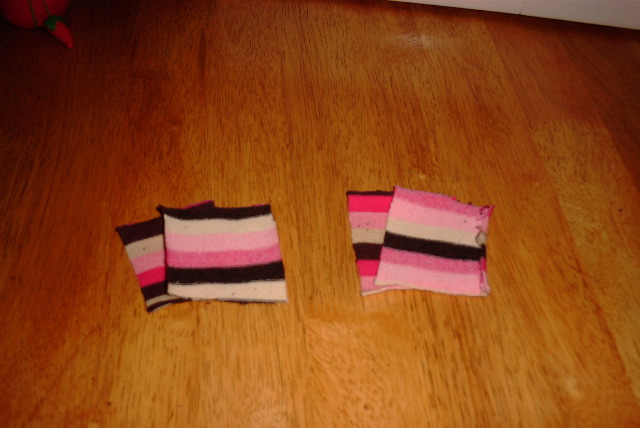
You should now have all the basic pieces of your sock monkey. Turn the arms right-side out and stuff them as you did the tail. Turn the ears as well and stuff them lightly. You’re now done with the sewing machine and everything else will be done by hand.
Step 17 – Stuff the parts
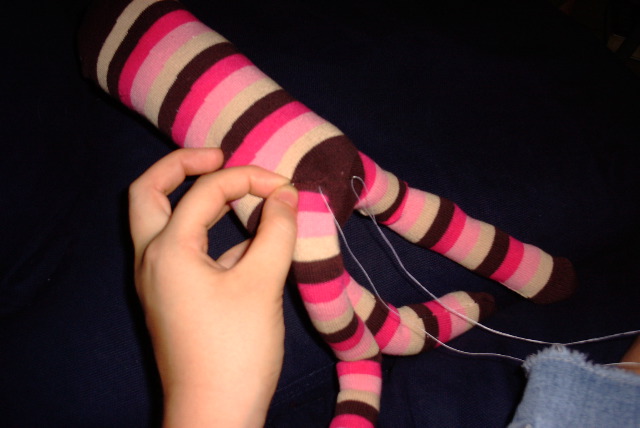
First, a word of warning. Don’t try to make this perfect. There’s no easy way to sew two tubes together at right angles. Just do your best and know you’ll get better with each one. The general idea here is just like it was with the crotch – fold raw edges inside and use small tight stitches to graft everything together. We start with the tail. I knot a length of thread and bring it up from inside the tail near the seam to secure it. Then fold the raw edges inside, pinch a bit of the tail to the body, and start tacking it down with stitches. Try not to stretch the tail “circle” out too far. I try to keep the long tail seam at the bottom to hide it (but sometimes the tail rotates a bit as you sew it). I generally go around the tail twice to make it as strong as possible. Then secure your thread and hide the loose end in the body.
Step 18 – Sew on the tail
Next the arms. Do these exactly like you did the tail. I generally position them about halfway up the body. (It’s useful to have stripey socks for this, because you can use the stripes to line up the arms perfectly.) Again, I tend to sew around each arm twice for strength.
Step 19 – Sew on his arms
Your monkey now has all his limbs! It’s time to give him a face.
Step 19 – Finished
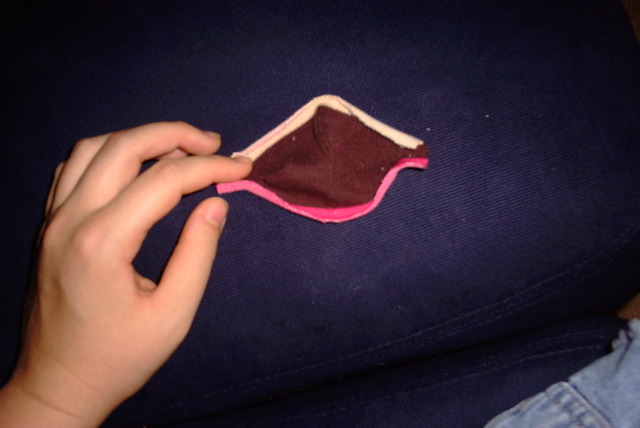
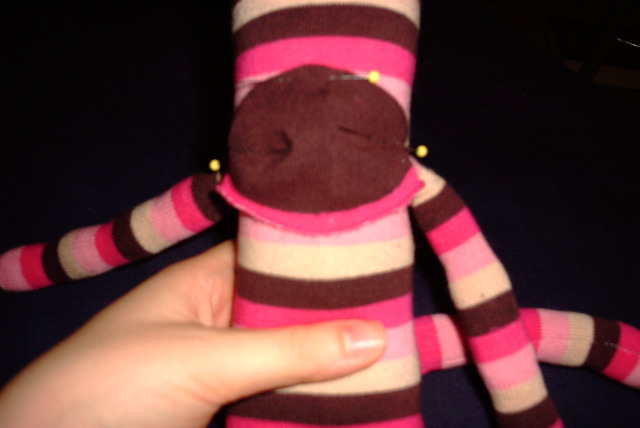
Take a look at the heel before we get started. It probably looks pretty big in comparison to your monkey’s head. That’s good. You see, the trick when you sew it on is not to sew it on flat. We want to leave room to stuff it and have it look three-dimensional. Just keep that in mind.
Step 20 – The face
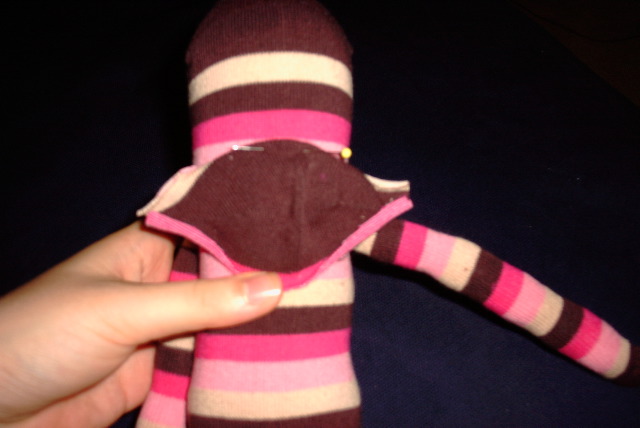
I start by folding down the top edge of the face and centering it on the monkey’s head. Then I pin through that folded top edge to hold it. (It’s nice to have a heel that’s a different color from the rest of the sock because the color change makes for a good fold line.)
Step 20 – Pinning the face
In this next blurry shot, you can see that I’ve folded and pinned the top edge at each corner as well. You can unpin it and move it if it looks off-center between the arms. Please note that we haven’t touched the bottom edge yet, and there’s still plenty of material bunched up in the center. Don’t try to stretch it flat. We just want our top edge to be a nice curve, almost a half-circle.
Step 20 – More pins
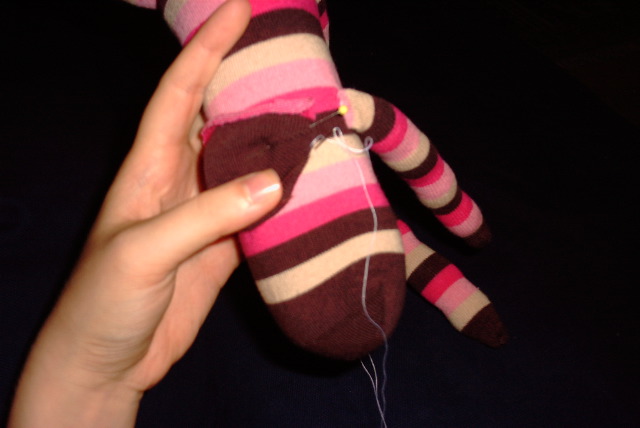
It’s time to start sewing the face. Starting at the left corner (as you’re looking at the monkey; he’s upside-down here) sew along the top just as you did on the arms and tail. You can hide your knot inside the face. Just take tiny stitches catching a bit of the folded face edge and the body behind it. Stop when you get to the opposite corner. Remove your pins.
Step 21 – Sew the face
Now for the bottom of the face. Fold the raw edge in and pin it down in the center as shown. Pin the bottom edge a little higher than your first instinct; we want to leave extra material in the middle to fill with stuffing. (You can see it bunched up here.) Continue sewing from the right corner down to the bottom center. Then stop, because it’s time to stuff!
Step 21 – More sewing
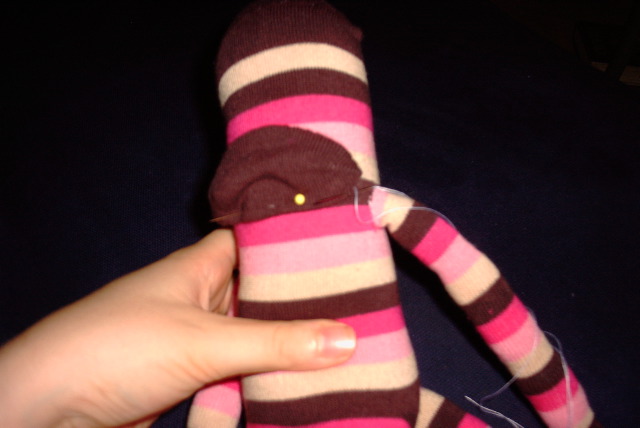
Here you can see me stuffing the face through the opening at the left corner. Just tear your stuffing into small pieces and shove them in. Don’t be afraid to stuff it quite firmly. If you’ve done it right, you should get a nice three-dimensional “lump”. Then just continue sewing around to close the gap. I don’t think it’s necessary to go around the face twice (as the monkey’s owner hopefully won’t be picking it up by the face like they would the arms and tail), but you might want to do it anyway. Secure your thread and hide the loose end in the body.
Step 22 – Stuff the face
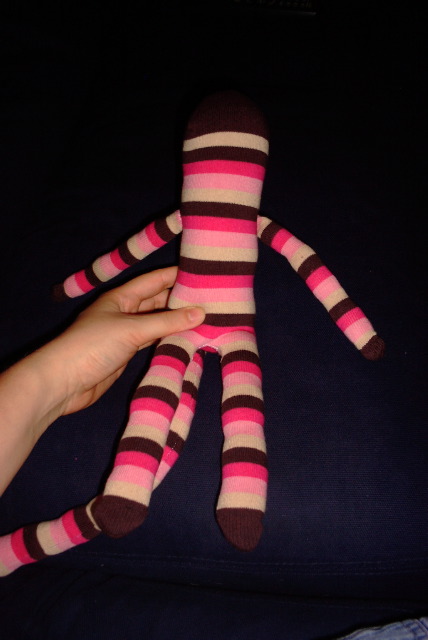
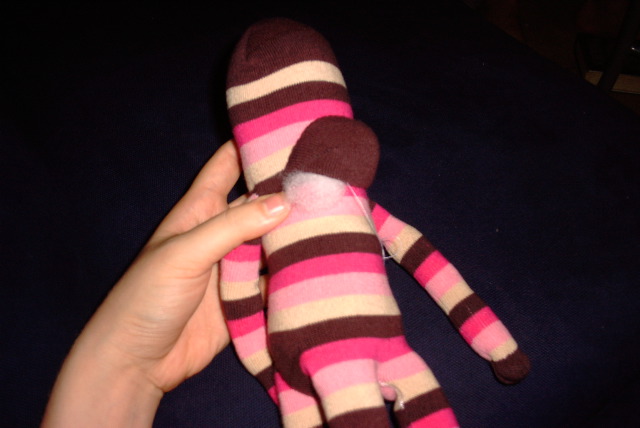
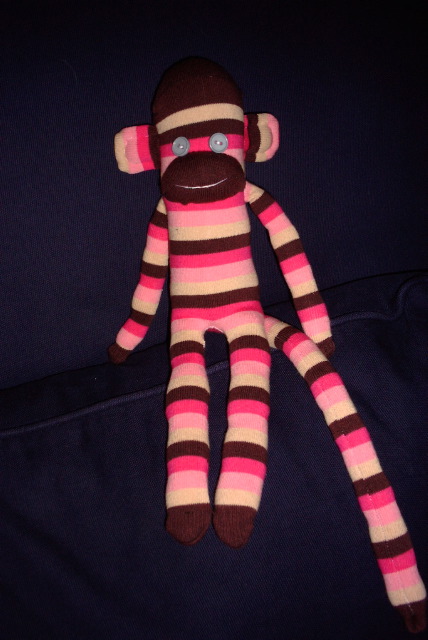
Here’s our sock monkey so far! Now we just need a few finishing touches… Ears, eyes, and a smile!
Step 22 – Finished face
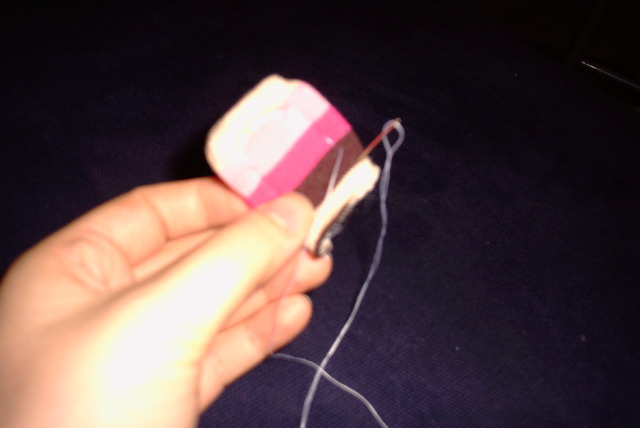
Sorry this picture is so crap. Basically, what I’m doing here is my own monkey ear innovation. Before I attach the ear to the monkey, I sew a few big stiches along the edge to give a little ear rim definition. I just think it looks a little nicer. You don’t have to do it though.
Step 23 – Sew ear rim
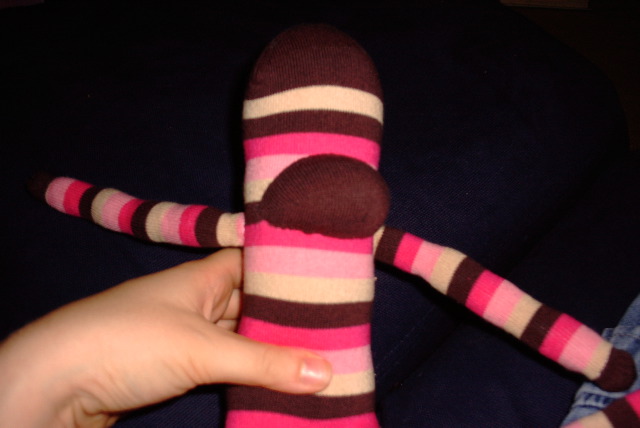
This extremely blurry shot is supposed to be me sewing on one of the monkey ears. It’s done the same way as everything else, by tucking in the raw edge and tacking the folded edge down to the body. Ears are a little more tricky (in that they’re not a nice circle), but just go round them twice and don’t be afraid to pull them into place. I generally place them in line with the arms just below where the toe of the sock starts. (Again, stripes are nice here for aligning perfectly.) Don’t worry too much if they don’t match exactly. I always end up with one slightly farther back than the other but it’s part of the charm, right?
Step 24 – Sew on ears
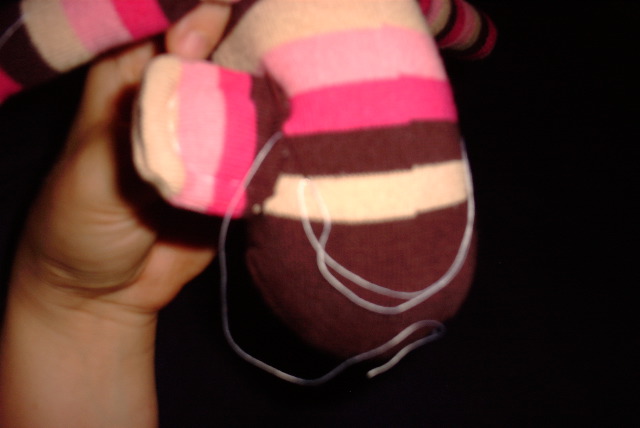
Here’s the attached ear so you can see the placement and my little ear
rim stitches…
Step 24 – One ear finished
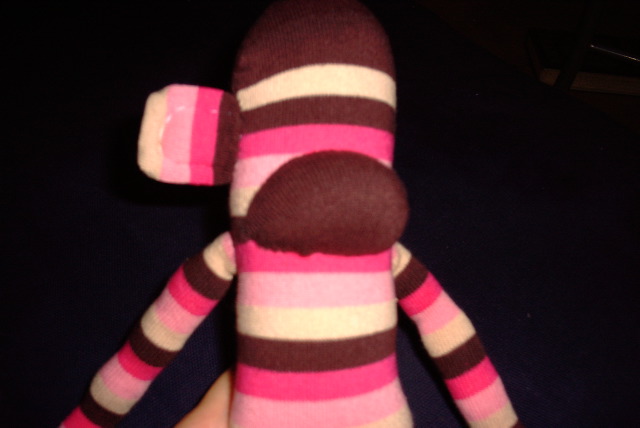
Now with both ears attached…
Step 24 – Both ears finished
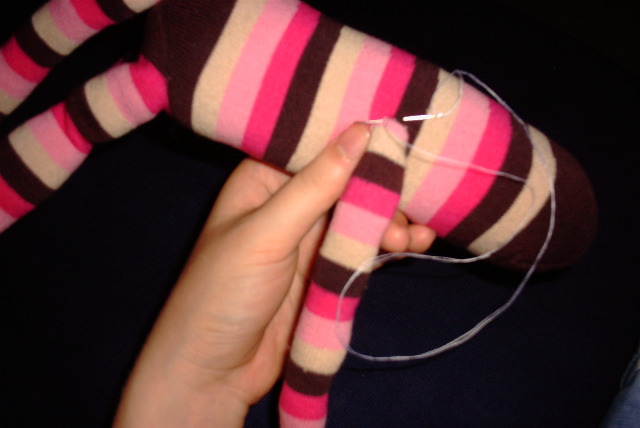
For eyes, I like to use matching buttons. (I’ve also used “googley” eyes in the past but I think they look a little scary.) My buttons came from the bargain bin at my local sewing shop. Just pick out two you like and tack the first one down. I knot this thread a few times and then pull it down into the body to start. Once you’ve secured the button, take the thread down into the body and bring it back up for the second eye. After you’ve secured that, you can bring the thread up in the face to complete the smile. You can choose any embroidery stitch you like. I tend to use a stem stitch, but a backstitch would work well too. It’s up to you! Or you can leave him without a mouth. When you’re done, knot the thread and hide it down in the body.
Second Canva for Work feature is now revealed!! (And if you pause it, I’m actually the fourth avatar down in the little chat window…) SO EXCITED FOR THIS LAUNCH!
For his home-cooked birthday dinner, he wanted brekkie. Pancakes, fried egg, and black pudding.


One response