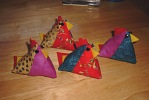
 Somebody recently e-mailed me to say that the pattern I linked for the Funky Chicken Pincushions has disappeared. In lieu I’ve written down the instructions as I remember them, along with a few crude drawings.
You need:
Two squares of different colored fabric, any size will do (though less than 4-inches becomes a bit fiddly)
Felt for the comb, beak, and tail
Stuffing
Buttons for the eyes (optional)
 Basically, the first thing you’re going to do is turn your two solid squares into two multi-colored ones. Start by pinning the two squares together with the right sides facing. Use a pen to draw a diagonal line between two opposite corners (through the center). You’re going to sew two lines down along this one, one on each side. If you’re using a sewing machine, just line up your presser foot with the marked line. If you’re doing it by hand, just mark two more lines approximately 1/4″ on either side. Now sew along those two lines. When you’re done, cut down the center marked line. You now have two new squares, each made up of two different colored triangles. Break out the iron and press each one, opening up the seams and pressing them flat.
 Now it’s time to cut out your beak and comb. There’s no exact size or shape here; just eyeball it. (I tend to make my combs about a third as long as the side of the square.) Lay out one of your squares right-side up. Place the beak and comb as shown in this diagram. Now lay the other square face-down on top of them, making sure the colors align. Pin everything together as best you can.
More sewing! Sew along the dotted line indicated. Start in the corner opposite the beak and comb, and go for an inch or so. Secure the seam and cut the thread. Now start again an inch or so farther along. (This leaves an opening through which you will eventually turn the chicken right-side out.) Turn at the corners and continue to sew around the next two sides, making sure you go through the beak and comb. Leave the last side open.
 Okay, now you need to cut two tail pieces out of felt. Besically, these are just triangles. I like to make them different colors to coordinate with the fabric. Make one smaller than the other and pin them together through the center. Now here’s the tricky bit (and the part I can’t draw): One side of your square is still open, right? Well, squish it. By that I mean, open it up and line up the two seams in the middle. This is how you get the “pyramid” shape of the chicken. It helps to finger-press those seams open so you can get it lined up just right. You’re going to sandwich your tail in that opening, so use the pin to center it along the seams, with the points inside the chicken and facing up towards the “comb” side. (You’ll have to peek inside there to make sure you’re not putting the tail in upside-down.) Now pin the three layers together and sew across the seam. You should now have the basic chicken shape, except its features are all on the inside.
Use the opening you leave to turn your chicken right-side out. Stuff him through the hole and then slip-stitch it shut as best you can. Add some buttons for eyes if you want, and you’re done! With a sewing machine you can really crank these puppies out quickly, and it’s a great way to use up extra fabric you have lying around. Have fun!


4 responses